Pydoll: WebDriver-Free Browser Automation in Python
Let’s explore Pydoll, the Python library for browser automation without WebDrivers, featuring scraping-ready features—complete with practical examples!
Pydoll is a Python browser automation library that connects directly to the Chrome DevTools Protocol. It’s based on a clean implementation, also offering realistic ways to click, navigate, and interact with elements to limit bot detection.
The idea behind Pydoll is simple: browser automation shouldn’t require mastering complex configurations or constantly battling anti-bot systems!
Follow me through this full walkthrough to discover what Pydoll is, how it helps you scrape a dynamic web page, what features it provides, and what the future holds for the project.
Introduction to Pydoll: Getting Started
First things first, let me introduce the project so you have a clear understanding of what this library is and the unique features it offers.
What Is Pydoll?
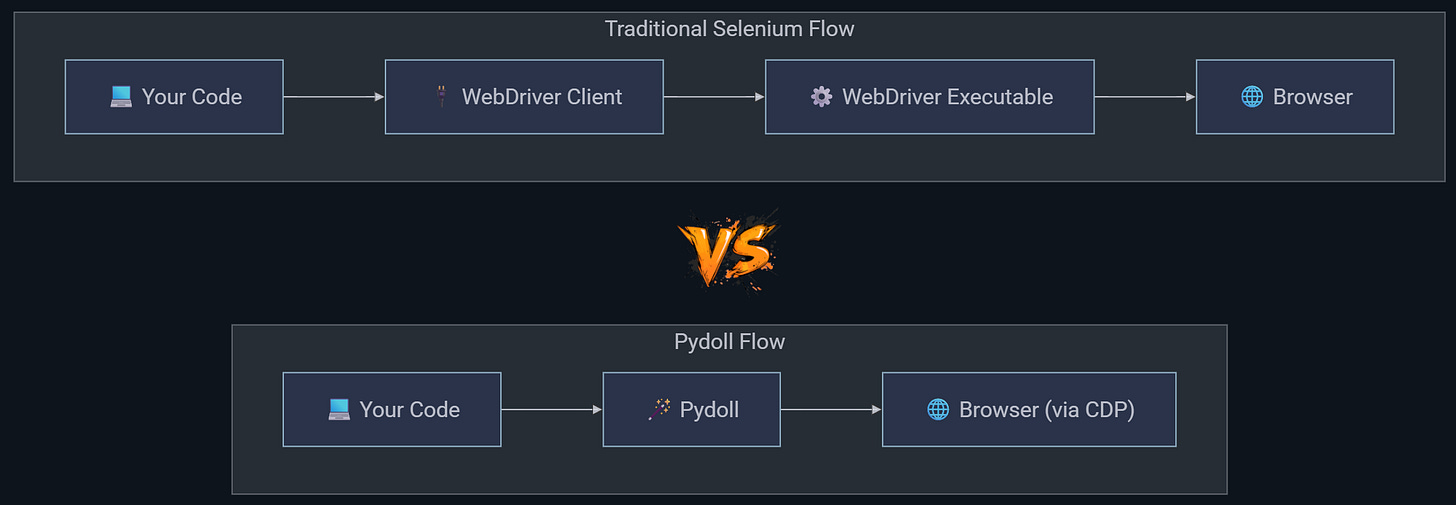
Pydoll is a Python library built for browser automation directly via the CDP (Chrome DevTools Protocol), with no external WebDriver required.
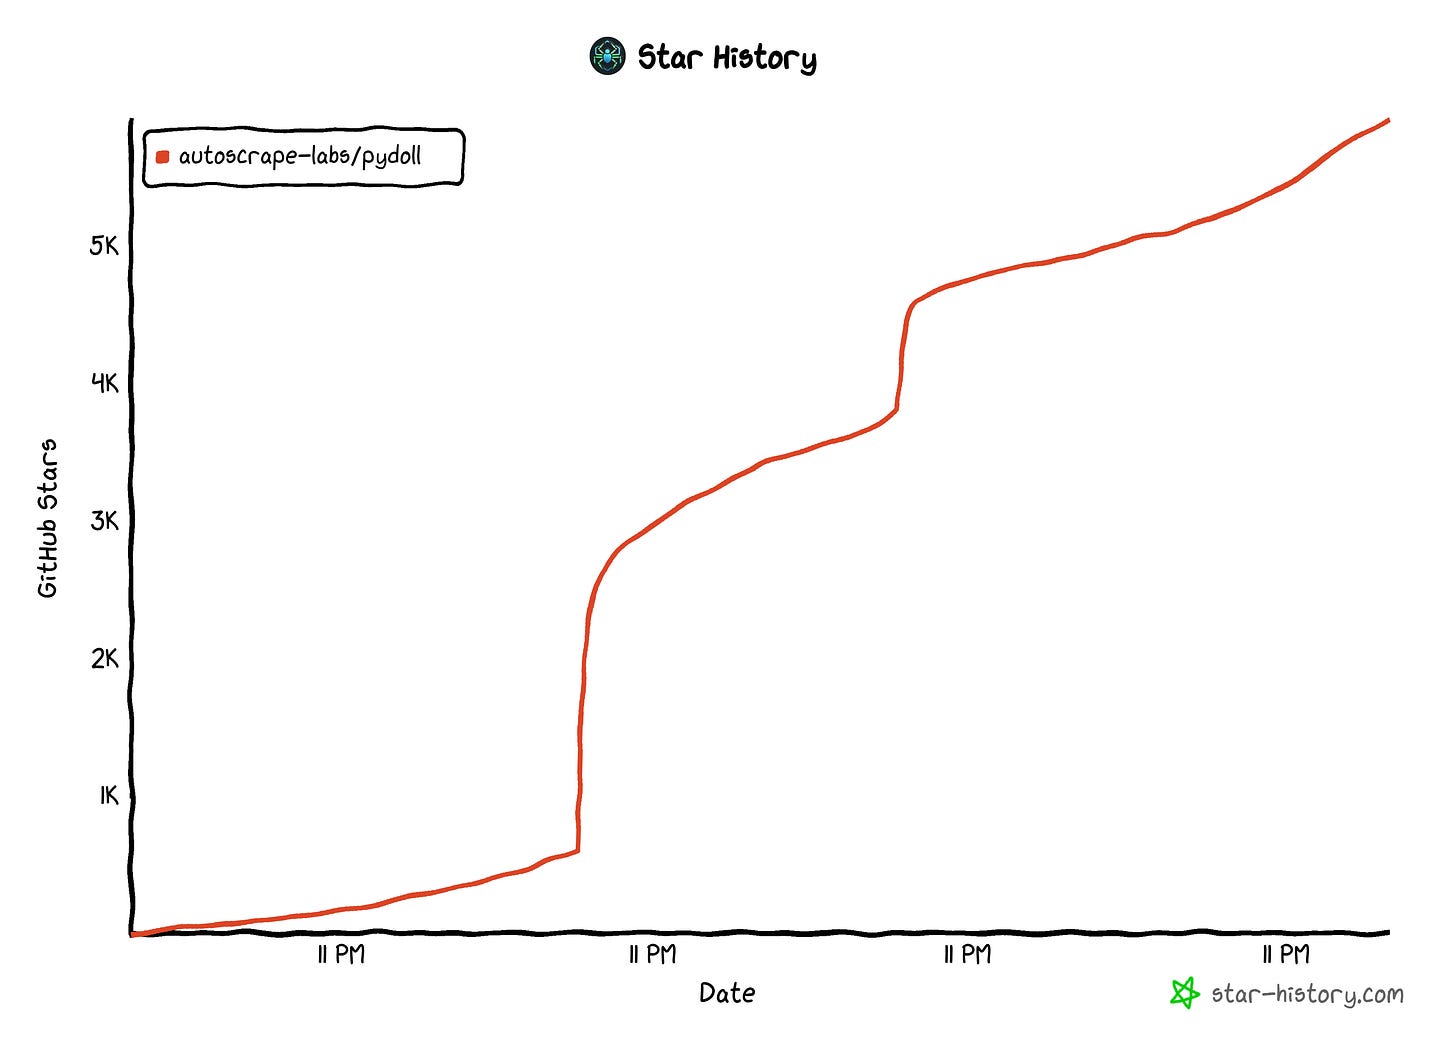
The project is open source and has gained over 5.9k stars on GitHub, showing significant growth over the past few months:
The project is actively maintained by Thalison Fernandes, with valuable contributions from the community.
What makes Pydoll stand out is its zero-driver setup, async-first architecture, and human-like interaction engine. Now, its primary use case is clearly web scraping of dynamic, JavaScript-heavy websites, but Pydoll also excels at E2E (End-to-End) testing of modern web applications.
Before proceeding, let me thank Decodo, the platinum partner of the month, and their Scraping API.
Scraping made simple - try Decodo’s All-In-One Scraping API free for 7 days.
Main Features
From a technical point of view, the most notable features Pydoll offers are:
Direct CDP connection (no WebDriver): Connects directly to the Chrome DevTools Protocol, removing WebDriver dependencies and avoiding compatibility headaches. This results in fewer moving parts and direct access to low-level browser APIs for stable and effective automation.
Async-first architecture: Built around Python’s asyncio for high concurrency across tabs and tasks for efficient large-scale scraping and parallel end-to-end testing with minimal boilerplate.
Browser-context HTTP: Executes API calls directly within the browser context, inheriting cookies, authentication data, and CORS policies for simplified session handling.
Robust download handling: Provides a context manager to wait for and collect downloads reliably, with options for custom directories, cleanup, and multiple read formats.
Deep browser preferences: Exposes hundreds of Chromium configuration options for fine control over privacy, locale, permissions, and browser fingerprinting.
Intuitive element APIs: Provides modern find() and query() methods with support for CSS/XPath selectors, attribute-based searches, and flexible error handling.
Concurrent multi-tab automation: Supports running multiple tabs in parallel using asyncio.gather(), opening the door to faster data collection and testing without additional processes. Learn more about multi-tab management.
Human interaction simulation: Simulates keyboard input (including hotkeys or shortcuts of up to three keys) and basic scrolling via the Scroll API and Keyboard API, respectively.
Network interception and modification: Allows intercepting, inspecting, and editing requests and responses. Useful for mocking APIs, analyzing performance, and testing edge cases.
Type safety and developer ergonomics: Offers well-typed APIs with rich IDE support, improving code completion, debugging, and error prevention during complex automation development.
For more details, examples, and explanations, explore the official Pydoll documentation.
What Makes Pydoll Special
In short, there are four main unique aspects that characterize Pydoll you need to remember:
No web drivers: Connects directly via CDP, avoiding WebDriver dependencies and setup issues.
High performance: Asynchronous design enables fast execution, parallel tasks, and multi-tab automation.
Simplicity and lightweight: Easy to install and use, letting you focus on automation logic without complex configuration.
Advanced human-like interaction engine: Simulates realistic mouse, scrolling, and human-like timing behavior to help bypass behavioral CAPTCHAs. (Note: This is coming soon, with features that will be added in the next releases!)
For a detailed analysis of the technical stack and the elements that make this library truly shine compared to other browser automation tools, take a look at the deep dive in the docs.
Pydoll in Action: A Step-by-Step Web Scraping Walkthrough
In this guided section, I’ll walk you through the steps to scrape a dynamic site using Pydoll. The target will be the infinite‑scrolling e‑commerce page from Scraping Course:
Note: Compare the final Pydoll script with a Playwright script that handles infinite scrolling on the same site.
The end result will be a list of products extracted from a page that requires JavaScript execution and realistic human interaction (basically, a perfect test for Pydoll!).
This episode is brought to you by our Gold Partners. Be sure to have a look at the Club Deals page to discover their generous offers available for the TWSC readers.
💰 - You can also claim a 30% discount on rack rates for residential proxies by emailing sales@rayobyte.com.
💰 - Get a 55% off promo on residential proxies by following this link.
🧞 - Reliable APIs for the hard to knock Web Data Extraction: Start the trial here
Step #1: Installation and Setup
To speed things up, I’ll assume you already have Python installed locally and a project with a virtual environment set up. Install Pydoll using the pydoll-python PyPi package:
pip install -U pydoll-pythonSince Pydoll is an async-first library, set it up inside a Python async function like this:
import asyncio
from pydoll.browser.chromium import Chrome

async def main():
    async with Chrome() as browser:
        # Launch the Chrome browser in headful mode (visible window, ideal for debugging) and open a new tab
        tab = await browser.start(
            headless=False  # Set to True for production scripts
        )

        # Browser automation logic for web scraping...

# Execute the asynchronous Pydoll browser interaction
asyncio.run(main())
This will launch a Chrome instance in headful mode (with the GUI), allowing you to follow the script in action and see how it simulates infinite scrolling. Fantastic!
Step #2: Connect to the Target Site
Use the go_to() method to instruct the controlled browser instance to navigate to the target page:
await tab.go_to("https://www.scrapingcourse.com/infinite-scrolling")The Chrome instance managed by Pydoll will now navigate to the page and automatically wait for it to fully load.
Step #3: Simulate the Infinite Scrolling Logic
As of this writing, Pydoll doesn’t yet provide a built-in API for human-like web scrolling (as explained in the docs, that’s a challenging task). In the future, you’ll be able to simulate realistic scrolling with a snippet like:
await tab.scroll_to(
    target_y=1000,
    realistic=True, # Momentum + inertia simulation
    speed="medium"  # Human-like scroll speed
)
Until that feature is ready, you can approximate human-like scrolling by using the ScrollAPI class available from the tab.scroll attribute:
from pydoll.constants import ScrollPosition
import random

for _ in range(50):
    await tab.scroll.by(ScrollPosition.DOWN, random.uniform(250, 500), smooth=True)
This code scrolls the page 50 times in small, randomized increments between 250 and 500 pixels. The smooth=True argument guarantees that the scrolling is performed with a smooth animation.
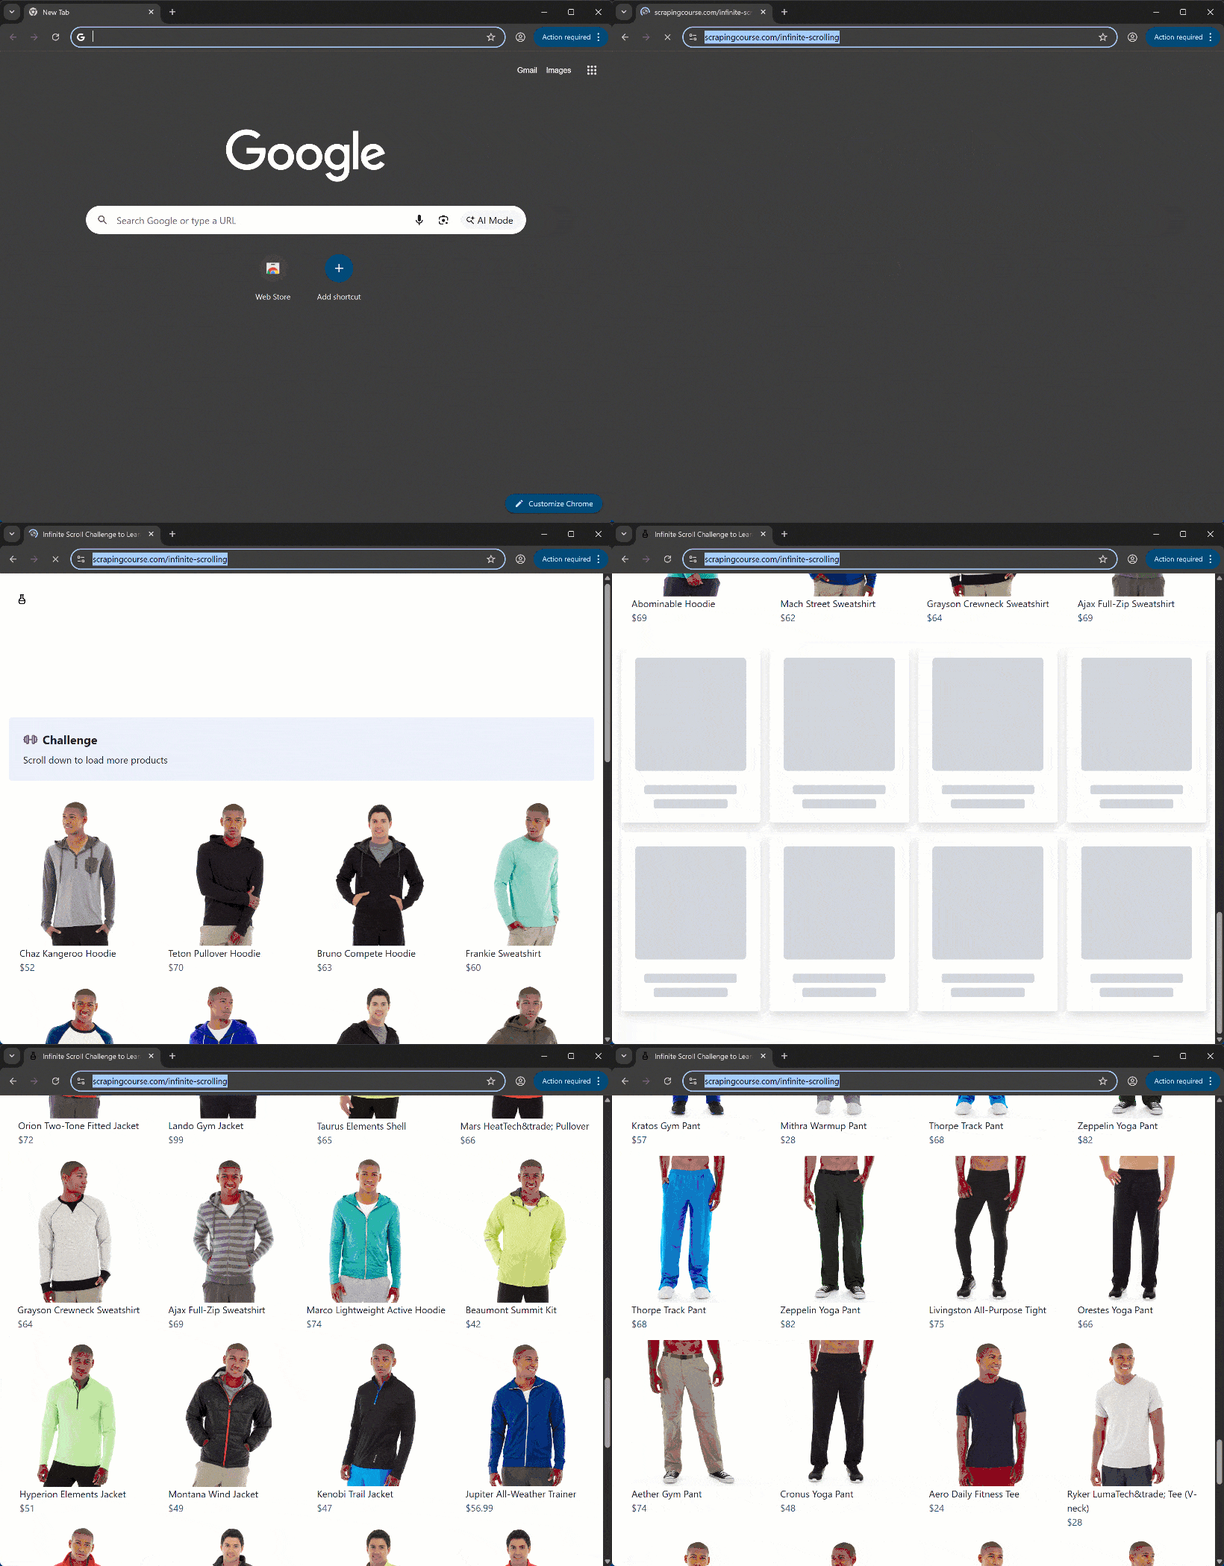
If you run your Pydoll script now, you should see:
As you can tell, the scrolling looks convincing, though it’s not perfect. The upcoming Pydoll API promises even more realistic behavior. In the meantime, Thalison has provided a simulate_human_scroll() utility function that you can use to get more natural scrolling.
Note: execute_script(”window.scrollBy(...)”) returns immediately. Instead, the methods in the Scroll API leverage CDP’s awaitPromise to wait for the browser’s scrollend event. This ensures that your next actions only run after scrolling has fully completed, which is ideal for dynamically loading content, as in this example.
Step #4: Wait for Element Loading
Now, the products load dynamically as you scroll down (after all, that’s how infinite scrolling works). So, before applying the data scraping logic, you must check that the product elements are actually on the page (and visible).
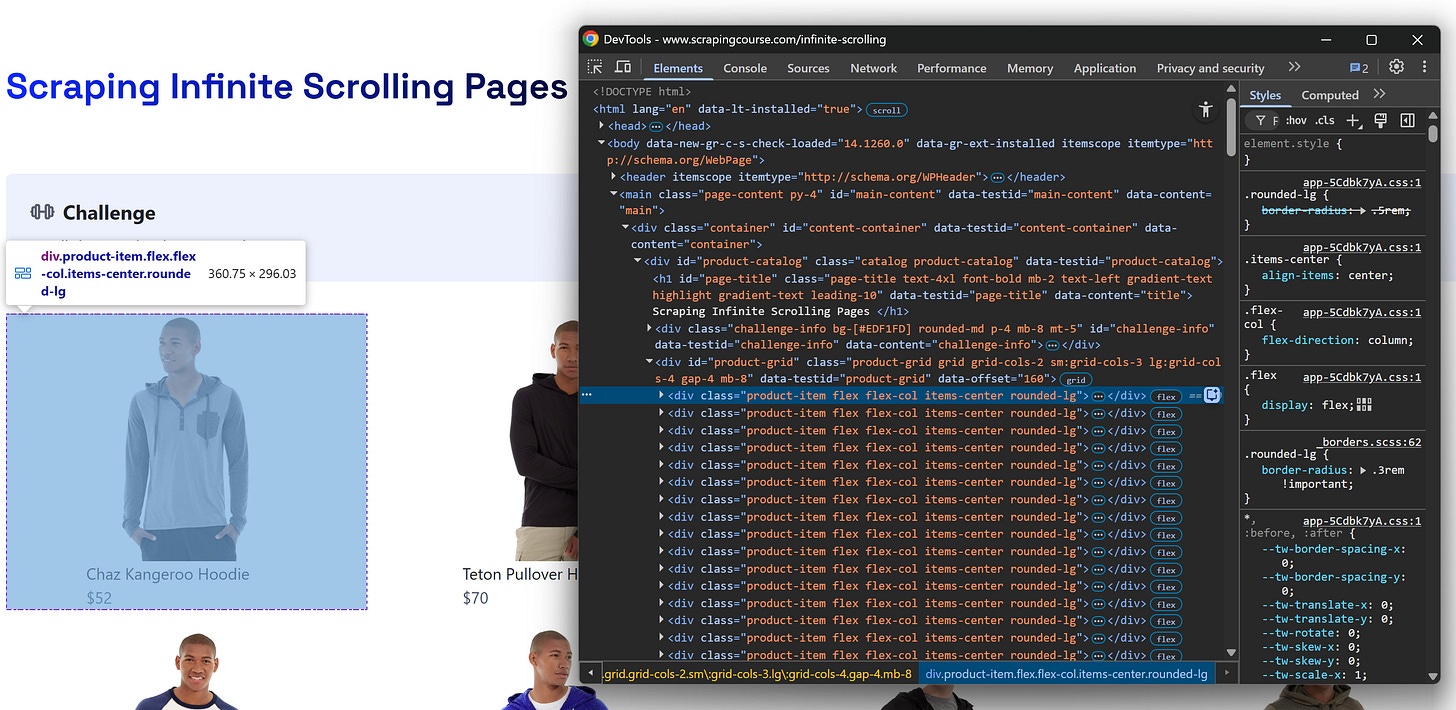
By inspecting a product element, you’ll see they all use the product-item class:
Assuming you’re interested in the first 150 products, wait for the 150th product element to appear in the DOM and become visible:
last_product_element = await tab.query(
    ".product-item:nth-of-type(150)",
    timeout=10,
)
await last_product_element.wait_until(is_visible=True, timeout=5)
The timeout option in query() ensures Pydoll waits up to 10 seconds for the element to appear in the DOM. Once found, wait_until() waits up to 5 seconds for it to become visible. That’s enough to verify that the products you want to scrape are available on the page!
Step #5: Implement the Data Parsing Logic
Now that you’re sure the product elements are on the page, select them all:
product_elements = await tab.find(
    class_name="product-item",
    find_all=True
)
This time, I used find() instead of query() to showcase Pydoll’s API (more on the difference between these two functions later on). Notice how the find_all=True option ensures that all matching elements are selected, not just the first one.
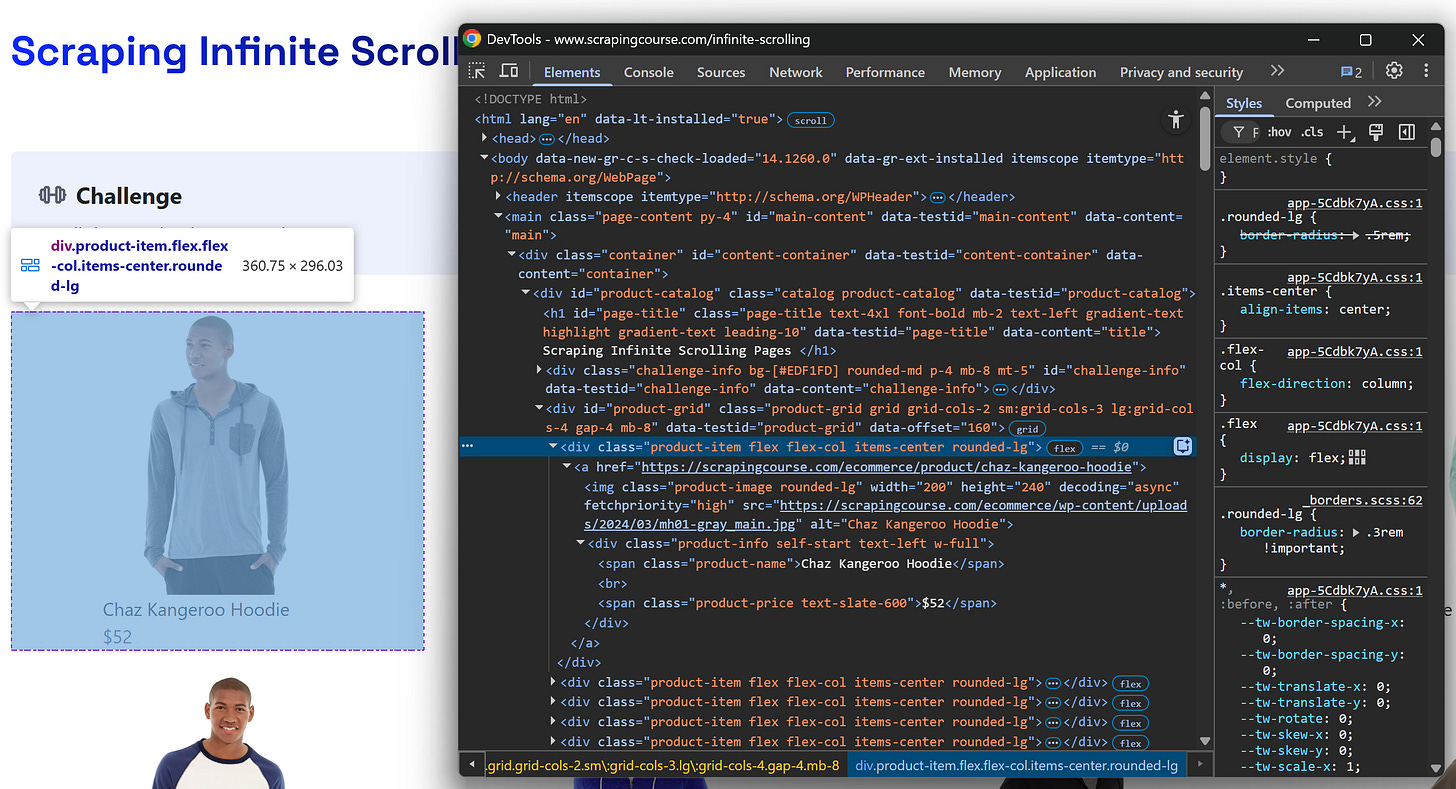
Inspect a product element to get familiar with its structure:
Next, create a list to store the scraped data and iterate over each product element to extract its data:
# List to store the scraped product data
products = []

# Iterate over each product element and extract relevant data
for product_element in product_elements:
    name_element = await product_element.query(".product-name", raise_exc=False)
    name = await name_element.text if name_element else ""

    image_element = await product_element.query(".product-image", raise_exc=False)
    image = image_element.get_attribute("src") if image_element else ""

    price_element = await product_element.query(".product-price", raise_exc=False)
    price = await price_element.text if price_element else ""

    url_element = await product_element.query("a", raise_exc=False)
    url = url_element.get_attribute("href") if url_element else ""

    # Store the scraped data
    product = {
        "name": name,
        "image": image,
        "price": price,
        "url": url
    }
    products.append(product)
By default, query() and find() raise an ElementNotFound exception if the element isn’t found. Setting raise_exc=False suppresses the exception, making the methods return None instead. This makes error handling in inconsistent page structures much easier and more flexible. Pretty neat, right?
Step #6: Put It All Together
The final code for your Pydoll scraper will be:
import asyncio
from pydoll.browser.chromium import Chrome
from pydoll.constants import ScrollPosition
import random

async def main():
    async with Chrome() as browser:
        # Launch the Chrome browser in headful mode (visible window, ideal for debugging) and open a new tab
        tab = await browser.start(
            headless=False  # Set to True for production scripts
        )

        # Navigate to the target page
        await tab.go_to("https://www.scrapingcourse.com/infinite-scrolling")

        # Scroll 50 times by random increments between 250 and 500 pixels
        for _ in range(50):
            await tab.scroll.by(ScrollPosition.DOWN, random.uniform(250, 500), smooth=True)

        # Ensure the page has loaded at least 150 products by waiting for the 150th product element to be on the page and visible
        last_product_element = await tab.query(
            ".product-item:nth-of-type(150)",
            timeout=10,
        )
        await last_product_element.wait_until(is_visible=True, timeout=5)

        # Select all product elements
        product_elements = await tab.find(
            class_name="product-item",
            find_all=True
        )

        # List to store the scraped product data
        products = []

        # Iterate over each product element and extract relevant data
        for product_element in product_elements:
            name_element = await product_element.query(".product-name", raise_exc=False)
            name = await name_element.text if name_element else ""

            image_element = await product_element.query(".product-image", raise_exc=False)
            image = image_element.get_attribute("src") if image_element else ""

            price_element = await product_element.query(".product-price", raise_exc=False)
            price = await price_element.text if price_element else ""

            url_element = await product_element.query("a", raise_exc=False)
            url = url_element.get_attribute("href") if url_element else ""

            # Store the scraped data
            product = {
                "name": name,
                "image": image,
                "price": price,
                "url": url
            }
            products.append(product)

        # Handle the scraped data (e.g., store it in a db, export it to a file, etc.)

        print(products)

# Execute the asynchronous Pydoll browser interaction
asyncio.run(main())
Explore the docs for an infinite scrolling example from the author of Pydoll.
Launch the script, and you’ll get this result:
[{'name': 'Chaz Kangeroo Hoodie', 'image': 'https://scrapingcourse.com/ecommerce/wp-content/uploads/2024/03/mh01-gray_main.jpg', 'price': '$52', 'url': 'https://scrapingcourse.com/ecommerce/product/chaz-kangeroo-hoodie'},

# Omitted for brevity...

{'name': 'Breathe-Easy Tank', 'image': 'https://scrapingcourse.com/ecommerce/wp-content/uploads/2024/03/wt09-white_main.jpg', 'price': '$34', 'url': 'https://scrapingcourse.com/ecommerce/product/breathe-easy-tank'}]
Et voilà! In just around 65 lines of code, you were able to successfully scrape a dynamic site with the infamous infinite-scrolling pattern, all thanks to Pydoll.
Before continuing with the article, I wanted to let you know that I've started my community in Circle. It’s a place where we can share our experiences and knowledge, and it’s included in your subscription. Enter the TWSC community at this link.
Explore Pydoll’s API and Core Mechanisms
In this section, I’ll dive into Pydoll’s API and present its main functionality.
Element Finding
Pydoll provides two flexible methods for locating elements:
find(): For simple attribute-based searches (e.g., id, class, or other HTML attributes):
element = await tab.find(tag_name="input", type="email", name="username")query(): For CSS selectors or XPath expressions:
element = await tab.query('input[type="email"][name="username"]')Keep in mind that both provide options to handle dynamic pages where elements may appear slowly or be optional.
Once you have an element, traversal methods like get_children_elements() and get_siblings_elements() let you explore related elements from a known anchor. Refer to the official docs for full examples and details.
Click Interactions
Pydoll equips you with a click() method to simulate genuine mouse press and release events—unlike JavaScript-based clicks, which can instead be triggered with click_js().
Now, since human users rarely click exactly at an element’s center, Pydoll enables you to vary the click position to make interactions appear more human:
await submit_button.click(
    x_offset=8,   # 8 pixels right of center
    y_offset=-4   # 4 pixels above center
)
Also, you can control how long the mouse is pressed for each click (default: 0.1s):
await button.click(hold_time=0.05)These options help you mimic human behavior and reduce the risk of bot detection.
Typing
Pydoll’s type_text() method simulates human typing by sending keystrokes one by one, with a fixed delay between each character. The interval parameter controls that delay, making the typing appear more natural:
await username.type_text("I love web scraping", interval=0.13)For cases where realism isn’t needed—such as hidden input fields or automated backend operations—use insert_text(), which fills text instantly:
await user_token_element.insert_text("18c4eaea2dbe4d949b0bd8e71661835a0f660e87e703c65225334e6c038ece5b")Important: Future releases will support variable typing speeds with built-in randomization for even more lifelike input.
For details on keyboard control, including special keys, modifiers, and key combinations, check the official documentation.
File Uploads
If you’ve done any browser automation before, chances are you already know that file uploads can be a real headache. The problem is that browser automation tools struggle with OS-level file dialogs or hidden file inputs. That’s precisely why Pydoll provides dedicated APIs to
Pydoll aims to make the file uploads smooth, reliable, and fully automated by supporting two methods:
The direct file input approach is best for standard <input type="file"> elements. In those scenarios, utilize the set_input_files() method to assign a file path directly:
file_input = await tab.find(tag_name="input", type="file")
file_path = Path("./report.pdf")
await file_input.set_input_files(file_path)
When dealing with custom upload buttons or drag-and-drop zones that trigger a system dialog, the file chooser context manager is the better choice. The expect_file_chooser() method intercepts the dialog, sets the file automatically, and cleans up afterward:
async with tab.expect_file_chooser(files=file_path):
upload_button = await tab.find(class_name=".custom-upload-btn")
await upload_button.click()
Screenshoting
Pydoll makes it easy to capture screenshots with the take_screenshot() method:
await tab.take_screenshot(
    "page.png",
    beyond_viewport=False,
    quality=80
)
By default, this captures only the visible portion of the page. If you set beyond_viewport=True, Pydoll scrolls through the page to include the entire content in the screenshot.
Tip: You can also export a webpage directly to a PDF using the print_to_pdf() method:
wait tab.print_to_pdf("page.pdf")Other Features
For inline <iframe> support, network monitoring, request interception, and many other tools and methods available in the library, check out these two documentation pages:
Pydoll’s Advanced and Future Features
As I stressed for Scrapling, Pydoll comes with a long list of advanced features and mechanisms. Here, I can’t cover everything, but there are a few additional aspects worth highlighting!
Custom Browser Preferences
Unlike typical automation tools that expose only a few settings, Pydoll lets you control virtually any browser behavior found in Chromium’s source code. That’s because it gives you access to Chromium’s internal preferences and policies system.
In particular, you can:
Boost performance by disabling unused features.
Enhance privacy by limiting data collection.
Simplify automation by removing unwanted prompts and confirmations.
Improve stealth by tweaking the browser fingerprint.
Enforce policies normally restricted to admins.
These settings are applied through the browser_preferences property, which lets you modify Chromium’s configuration just like editing its internal JSON preferences file.
Note that when you assign new preferences, Pydoll merges them with the existing ones instead of overwriting everything. For example, suppose you configure the following options:
options.browser_preferences = {"download": {"prompt": False}}
options.browser_preferences = {"profile": {"password_manager_enabled": False}}
The second assignment won’t replace the first one! Instead, both sets of preferences are combined and stored together in the browser configuration.
This merge behavior helps you only modify the keys you specify while preserving all other existing settings. That’s a safer way to fine-tune your browser preferences without losing prior configurations.
Discover all supported browser configuration and preference customization options available.
Cloudflare Tunstile Clicking
Pydoll exposes an expect_and_bypass_cloudflare_captcha() helper method to perform a realistic click on a Cloudflare Turnstile checkbox (if it actually appears). Now, that’s not a magic CAPTCHA bypass solution, so Pydoll can’t:
Solve challenge puzzles (image selection, sliders, etc.).
Manipulate scores or spoof fingerprints.
Guarantee success.
What Pydoll does is just automating a human-like click on the CAPTCHA container. That may be enough to pass Turnstile in some environments, but success ultimately depends on external factors (e.g., IP reputation, browser fingerprint, observed behavior, etc.).
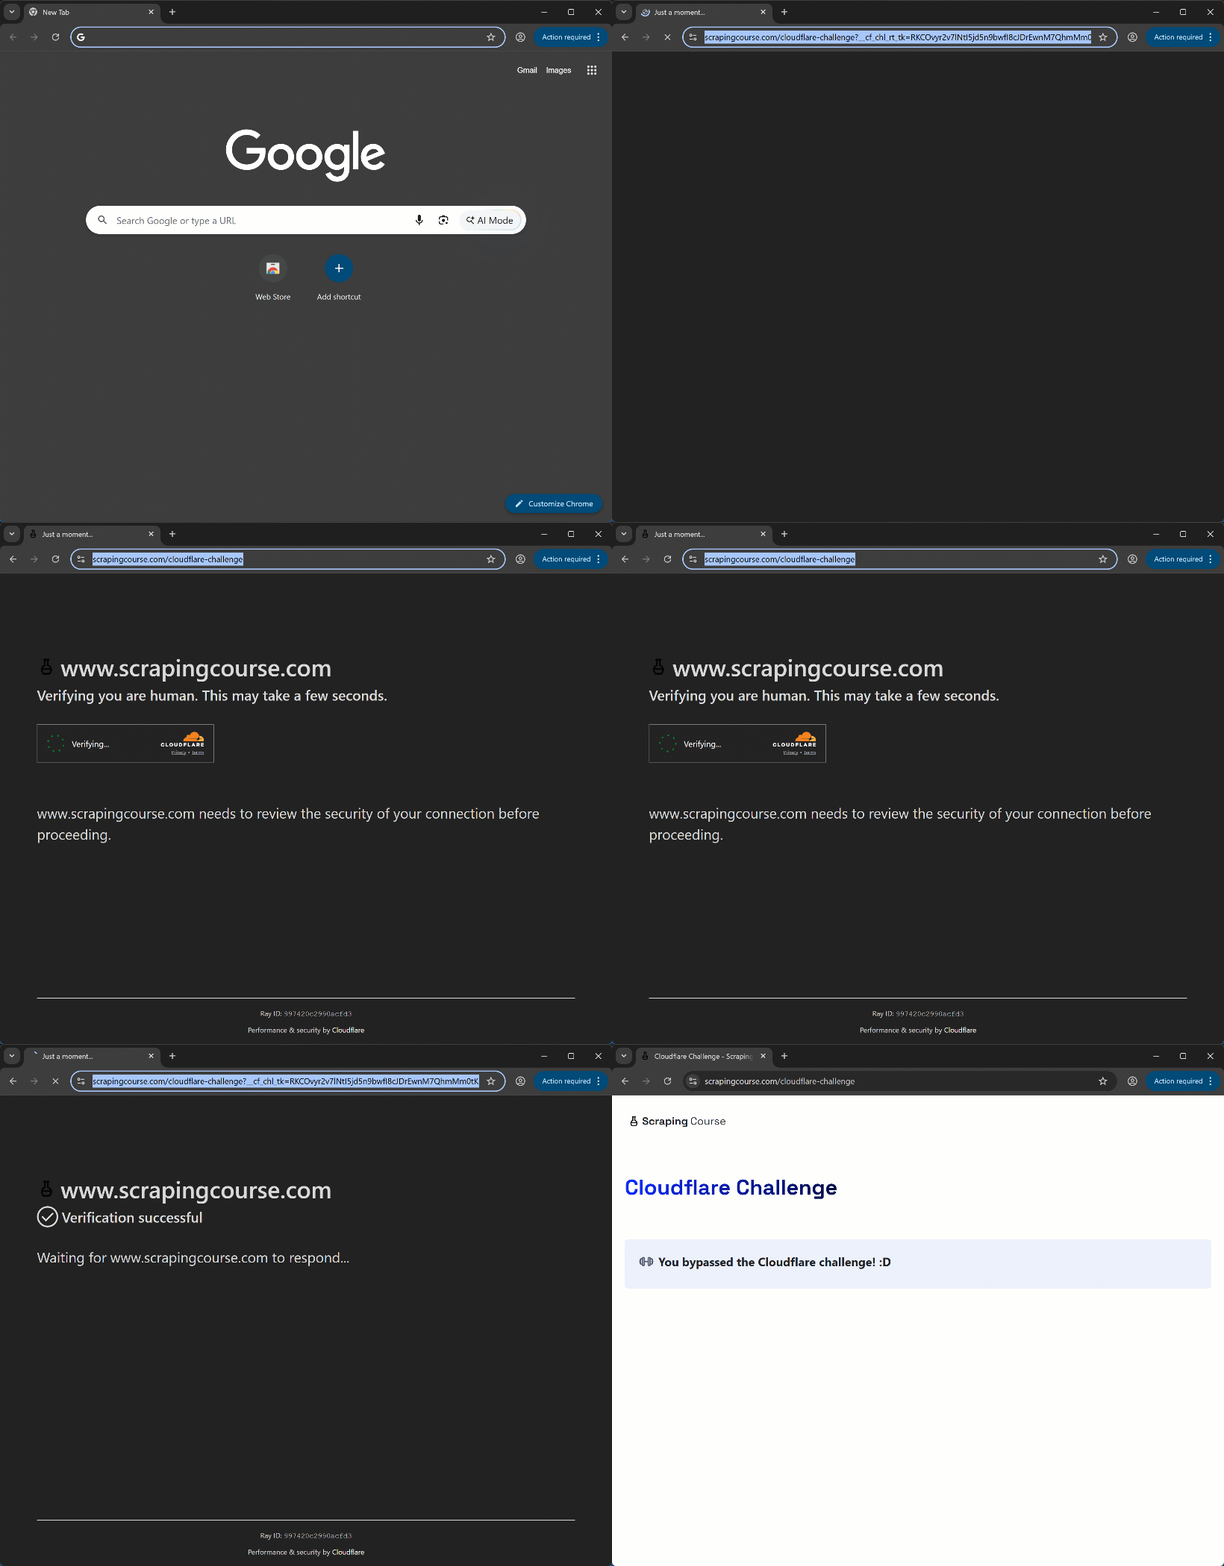
In my tests (using my local IP), the script below was able to pass the Cloudflare anti-bot check on the Scraping Course test page:
import asyncio
from pydoll.browser.chromium import Chrome
from pydoll.browser.options import ChromiumOptions

async def cloudflare_challenge_example():
    # Configure Chromium options to reduce automation detection
    options = ChromiumOptions()

    async with Chrome(options=options) as browser:
        # Start a new tab in the default browser context
        tab = await browser.start()

        # Automatically handle Cloudflare Turnstile captchas
        # The context manager waits for the captcha to appear and completes the interaction
        async with tab.expect_and_bypass_cloudflare_captcha():
            await tab.go_to("https://www.scrapingcourse.com/cloudflare-challenge")

        # Retrieve and print the main content behind the Cloudflare wall
        content = await tab.find(id="challenge-title", timeout=10)
        print(await content.text)

asyncio.run(cloudflare_challenge_example())
Specifically, that’s the result I got:
Then, in the terminal, I got this log:
You bypassed the Cloudflare challenge! :DRemember that Pydoll supports reCAPTCHA v3 as well. (Note: Check out Pierluigi’s and my series on solving reCAPTCHA v3 challenges: Part I & Part II.)
Concurrent Data Scraping
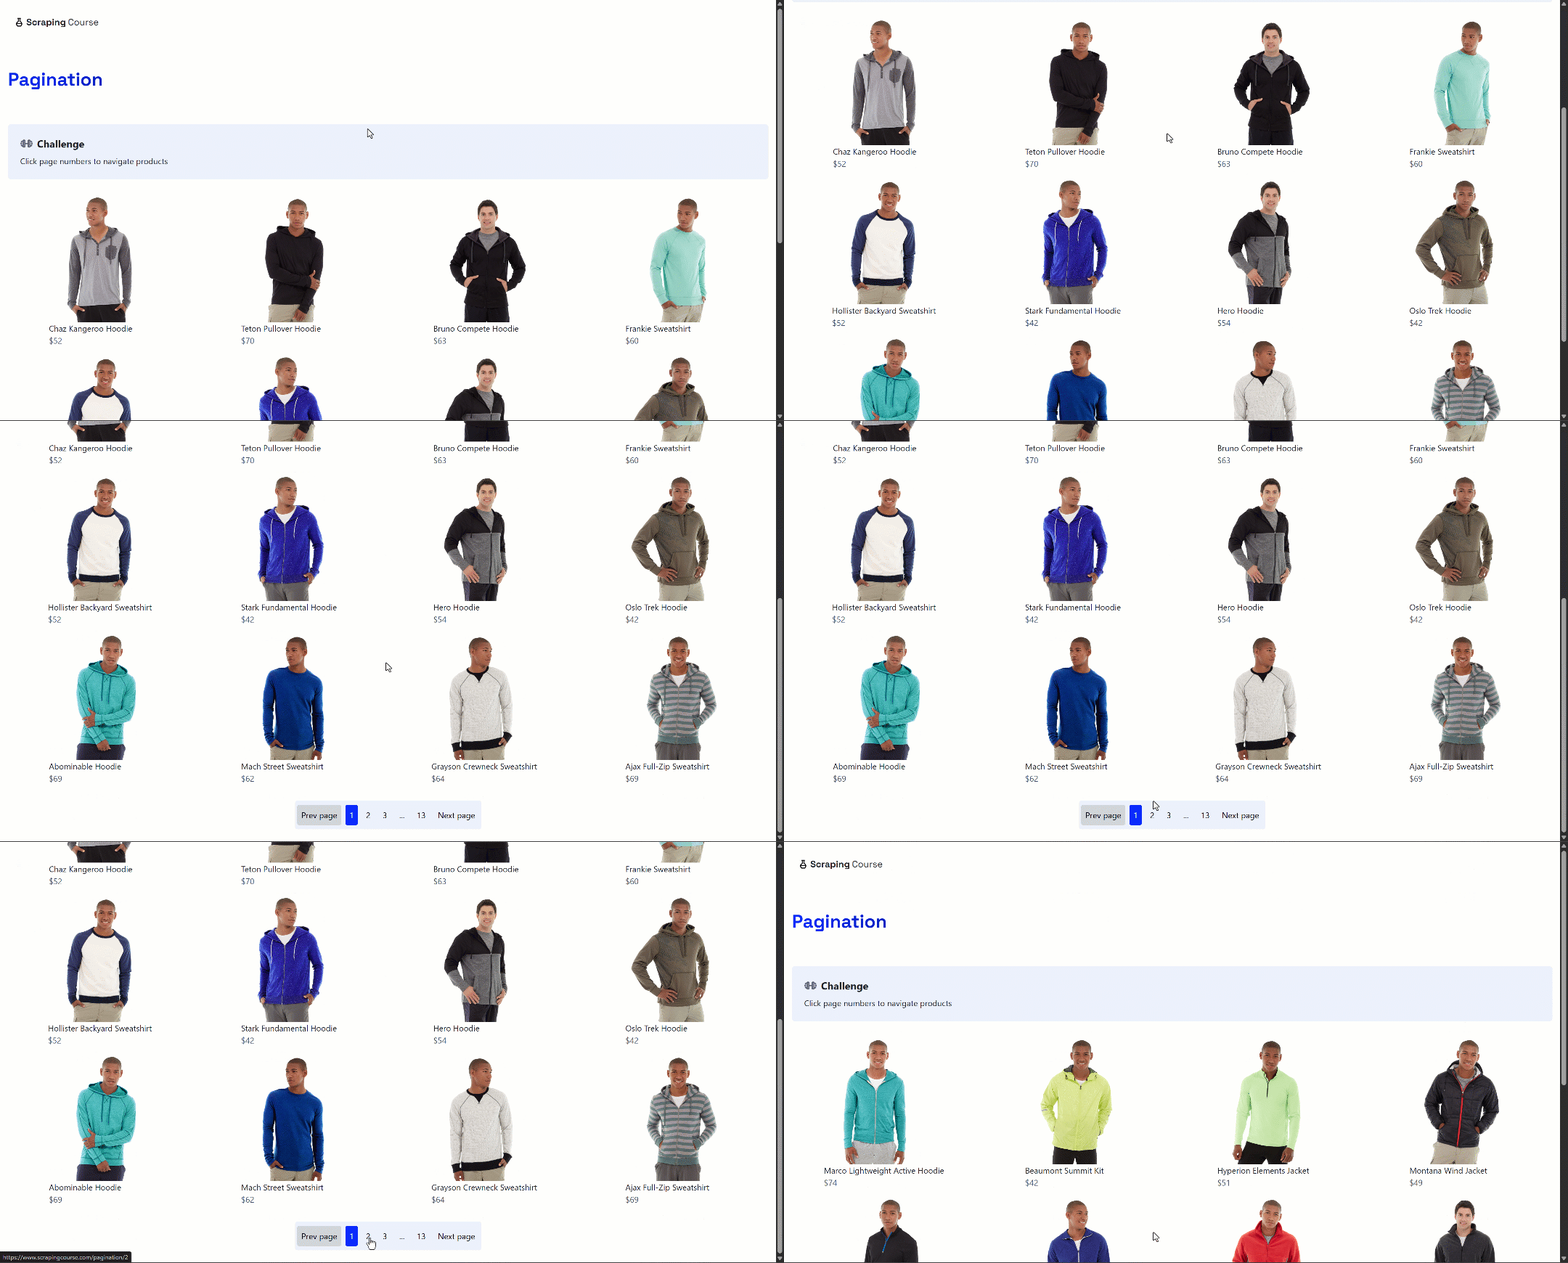
Assume you are interested in scraping multiple pages from the pagination version of the e-commerce site from Scraping Course, which I previously showed how to scrape:
In detail, consider that you want to scrape the first five pages. You could scrape each page one after another, but that’s inefficient!
As is often the case with sites using pagination, the URLs follow a specific pattern. In this example, the pattern is:
https://www.scrapingcourse.com/pagination/<PAGE_NUMBER>You can take advantage of that to manually (or programmatically via code) populate a list of URLs for scraping. Then, given that list, harness Pydoll’s async capabilities together with asyncio.gather() to scrape all pages concurrently:
import asyncio
from pydoll.browser.chromium import Chrome

async def scrape_page(tab, url):
    print(f"Scraping products from page: {url}")

    # Navigate to the target page
    await tab.go_to(url)

    # Where to store the scraped data in the current tab
    products = []

    # Find all product containers on the page
    product_elements = await tab.find(
        class_name="product-item",
        find_all=True
    )

    # Loop through each product element and extract details
    for product_element in product_elements:
        # Scraping logic
        name_element = await product_element.query(".product-name", raise_exc=False)
        name = await name_element.text if name_element else ""

        image_element = await product_element.query(".product-image", raise_exc=False)
        image = image_element.get_attribute("src") if image_element else ""

        price_element = await product_element.query(".product-price", raise_exc=False)
        price = await price_element.text if price_element else ""

        url_element = await product_element.query("a", raise_exc=False)
        url = url_element.get_attribute("href") if url_element else ""

        # Store the scraped data
        product = {
            "name": name,
            "image": image,
            "price": price,
            "url": url
        }
        products.append(product)

    return products

async def concurrent_scraping():
    # Pagination URLs to scrape simultaneously
    urls = [
        "https://www.scrapingcourse.com/pagination/1",
        "https://www.scrapingcourse.com/pagination/2",
        "https://www.scrapingcourse.com/pagination/3",
        "https://www.scrapingcourse.com/pagination/4",
        "https://www.scrapingcourse.com/pagination/5"
    ]

    async with Chrome() as browser:
        # Start the browser and open the first tab
        initial_tab = await browser.start()

        # Create one tab per additional URL
        tabs = [initial_tab] + [await browser.new_tab() for _ in urls[1:]]

        # Run all scrapers concurrently
        products_nested = await asyncio.gather(*[
            scrape_page(tab, url) for tab, url in zip(tabs, urls)
        ])

        # Flatten the list of lists into a single list of products
        products = [item for sublist in products_nested for item in sublist]

        # Display results
        print(f"\nScraped {len(products)} products.")

asyncio.run(concurrent_scraping())
Running the above script, you’ll get this output:
The result will be 60 products scraped, which is correct, considering that each page contains 12 products (12 × 5 = 60).
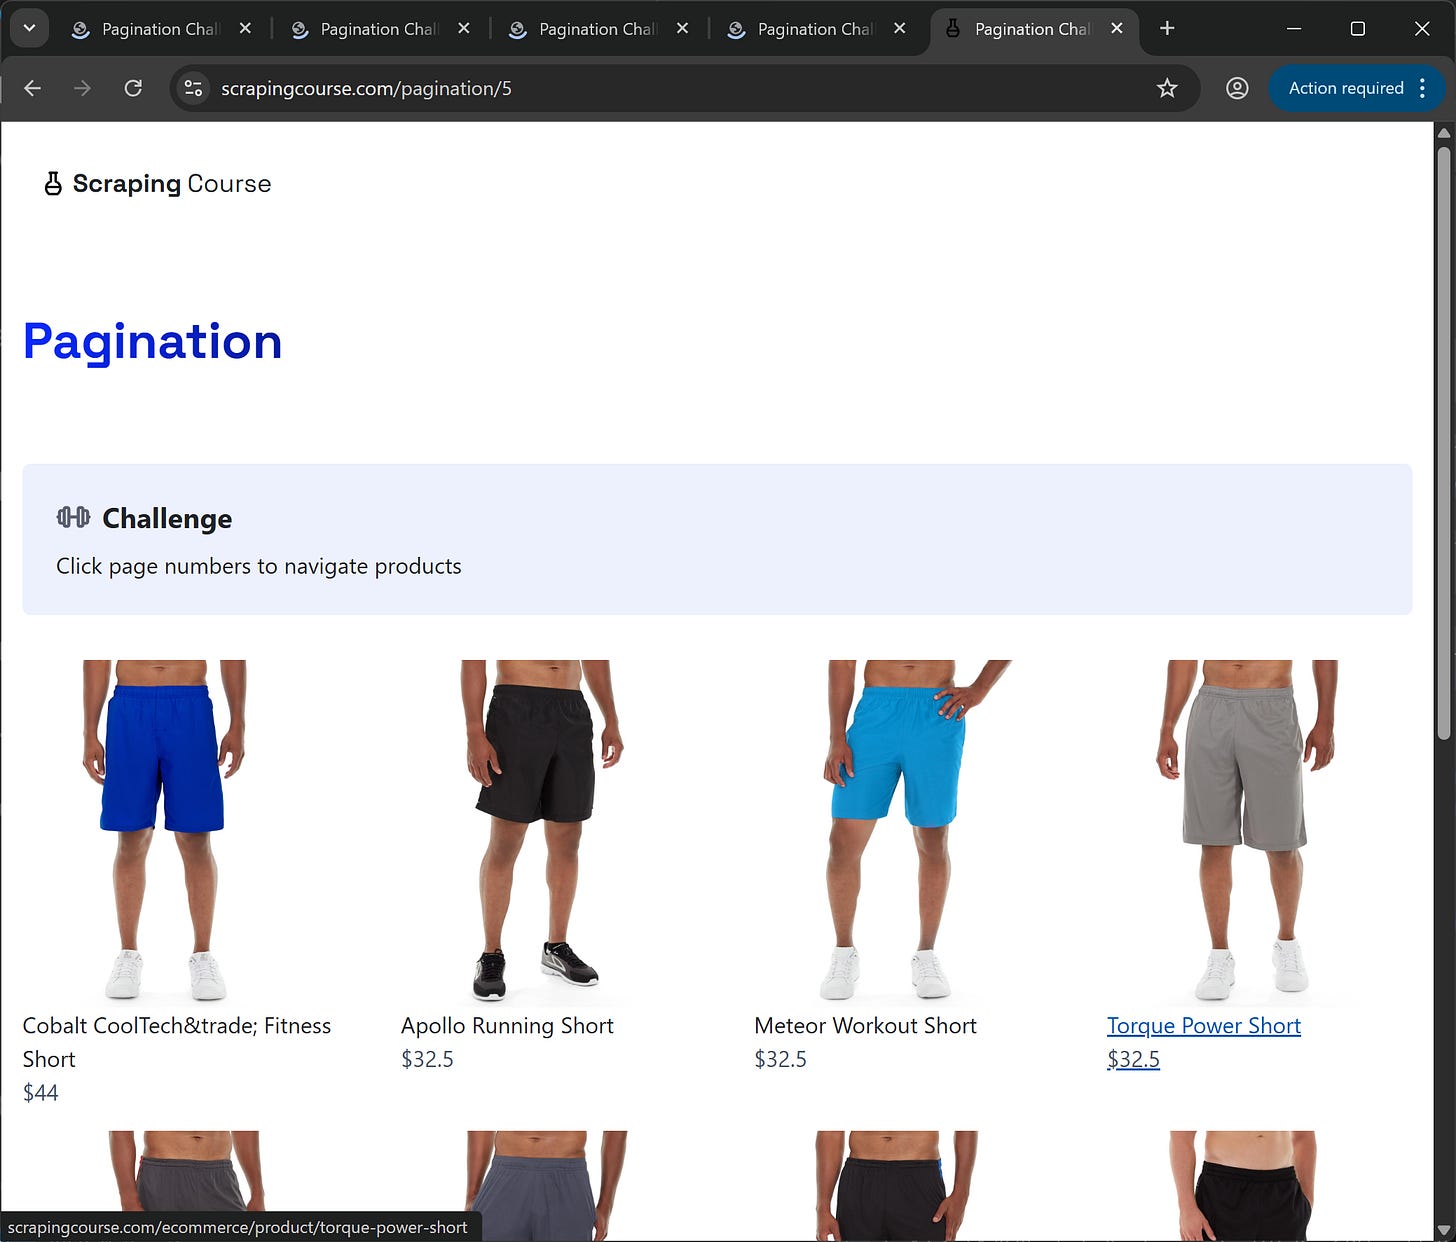
You’ll notice that the scraping time is quite low for five pages in a browser. That’s because the same browser context is reused, with five different tabs handling each of the specified pagination pages concurrently:
Learn more about the concurrent tab mechanism!
Browser Contexts
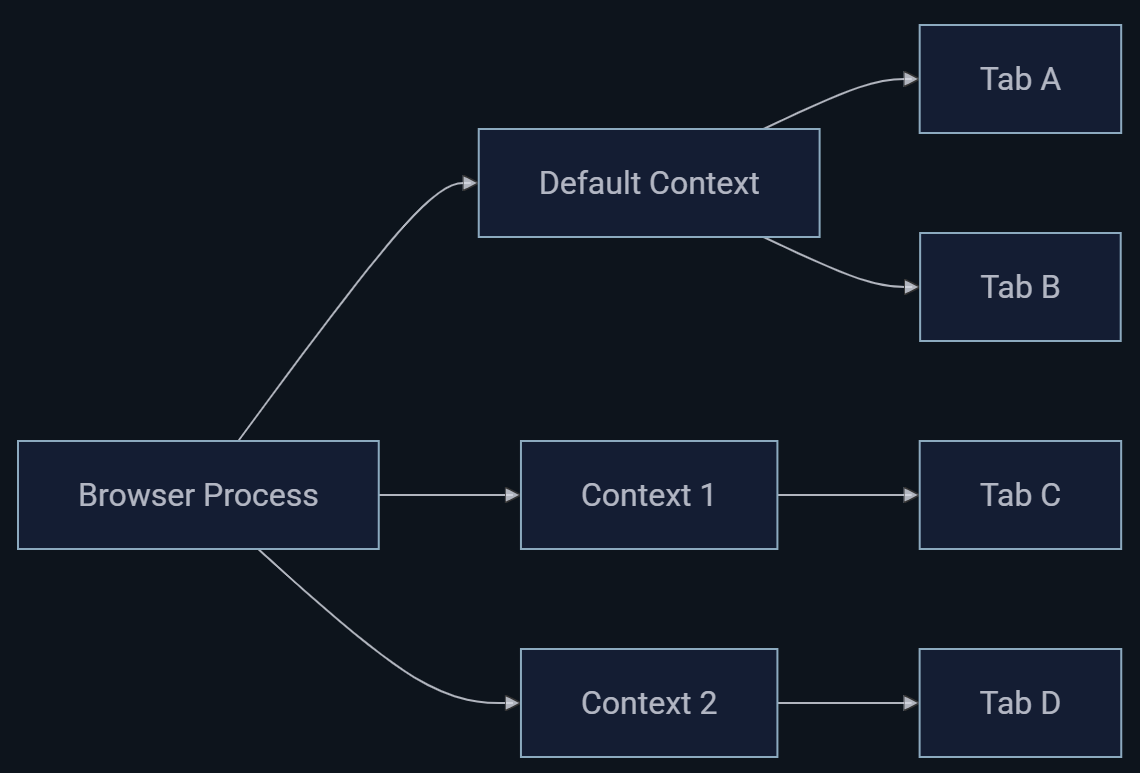
Browser contexts in Pydoll provide fully isolated browsing environments within a single browser process. Think of them as a sort of separate “incognito windows” with complete programmatic control.
Each context maintains its own cookies, storage, cache, and authentication state, allowing completely isolated tabs, unlike the default context—where all tabs share cookies, storage, and other data. Notably for web scraping, each context can have its own proxy configuration!
Create a new browser context via the create_browser_context() method and manage it as follows:
import asyncio
from pydoll.browser.chromium import Chrome

async def browser_context_example():
    async with Chrome() as browser:
        # Open initial tab in the default browser context
        default_tab = await browser.start()
        await default_tab.go_to("https://example.com")

        # Create a new isolated browser context
        context_id = await browser.create_browser_context()

        # Open a tab in the isolated context
        isolated_tab = await browser.new_tab("https://example.com", browser_context_id=context_id)

        # Set different localStorage values in each context to demonstrate isolation
        await default_tab.execute_script("localStorage.setItem('session', 'default')")
        await isolated_tab.execute_script("localStorage.setItem('session', 'isolated')")

        # Retrieve values from localStorage to verify isolation
        session_default = await default_tab.execute_script("return localStorage.getItem('session')")
        session_isolated = await isolated_tab.execute_script("return localStorage.getItem('session')")

        print(f"Default context session: {session_default}")    # Prints "session"
        print(f"Isolated context session: {session_isolated}")  # Prints "isolated"

asyncio.run(browser_context_example())
As you can see, the default_tab and isolated_tab live in two different browser sessions.
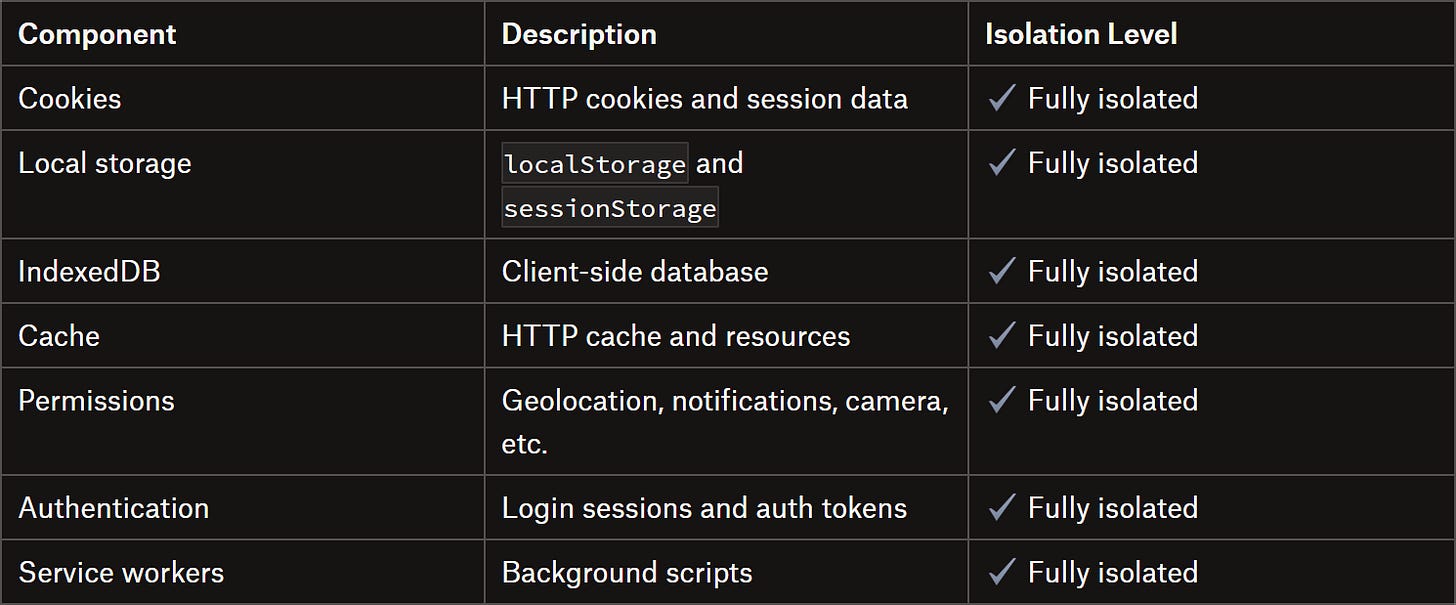
If you’re wondering exactly what an isolated browser context isolates, refer to this table:
Future Futures
Pydoll is currently in a major development phase aimed at implementing advanced bot-detection evasion techniques and more realistic user interaction simulation. Features promised by Thalison Fernandes to the community, which will be included in future releases, include:
Human-like mouse interaction engine: Simulates realistic mouse paths (using Bézier curve), with variable speeds, natural acceleration and deceleration, and randomized click holding and offsets. These natural motion patterns reduce behavioral fingerprints and make automation harder to detect by anti-bot systems.
Natural keyboard simulation: Types character by character with randomized dwell and flight times, optional typos and corrections, and realistic event ordering. That helps reproduce genuine typing behavior for form filling or UI testing.
Physics-based scrolling: Mimics real-world scrolling momentum and inertia to create smooth, human-like page movements. This approach improves realism in both scraping and end-to-end testing scenarios.
Timing and cognitive delays: Introduces randomized pauses before and after actions to imitate natural hesitation. These variations prevent deterministic timing and make automation traces less predictable.
These new capabilities will combine CDP and JavaScript capabilities to deliver highly realistic browser interactions. So, stay tuned for upcoming releases!
Conclusion
The goal of this post was to introduce Pydoll and highlight its unique features as a Python library for web automation, both for web scraping and E2E testing. As you’ve seen, it’s a powerful solution that lets you handle browser automation like a pro.
Keep in mind, this was just an introduction. For further questions or requests, you can reach out to Thalison Fernandes, the creator of this impressive project.
I hope you found this article helpful—feel free to share your thoughts or questions in the comments. Until next time!
FAQ
How to integrate proxies in Pydoll?
Pydoll extends Chrome’s standard --proxy-server flag to support authenticated proxies (which vanilla Chrome can’t handle directly). Specify a proxy like this:
import asyncio
from pydoll.browser.chromium import Chrome
from pydoll.browser.options import ChromiumOptions

async def authenticated_proxy_example():
    options = ChromiumOptions()
    options.add_argument("--proxy-server=<PROXY_URL>")

    async with Chrome(options=options) as browser:
        # ...
Where <PROXY_URL> can be:
For HTTP proxies: http://username:password@host:port
For HTTPS proxies: https://username:password@host:port
For SOCKS5 proxies: socks5://username:password@host:port
How can I start contributing to the Pydoll project?
To contribute, follow the official “Contributing Guide” on the GitHub page of the library.
Why doesn’t Pydoll rely on a WebDriver?
Pydoll connects directly to Chrome via CDP, simplifying setup—no downloads, PATH configuration, or version conflicts—and improving reliability. By removing the WebDriver layer, Pydoll provides direct access to advanced browser features such as page events, network interception, and JavaScript execution in a real tab.
What is the difference between Pydoll, Selenium, and Playwright?
At the time of writing, Pydoll, Selenium, and Playwright all control browsers via CDP. Now, Selenium, which is gradually migrating to BiDi, only introduced CDP support in version 4.0 (released at the end of 2021). Thus, many legacy scraping scripts still rely on Selenium 3, which required manual WebDriver management (that was a frequent headache….) Beyond this aspect, Pydoll offers a richer API for web scraping scenarios (and, in the near future, will include features for detecting anti-bot protections!)






This is a super interesting project. I'll definitely compare Pydoll with our own solution at Kameleo, since we also work heavily with browser-level automation and anti bot challenges.
The Cloudflare Turnstile section caught my attention the most. We deal with this a lot as well. In our Chromium and Firefox based browsers (Chroma & Junglefox) we even modified the native browser code to expose the shadow DOM root, which makes elements like the Turnstile checkbox trivially clickable from Playwright. On top of that, we handle the browser fingerprint authenticity across scale so that behavioral checks stay consistent.
Excited to follow Pydoll's evolution and see how it develops on the human interaction and bot detection evasion side.