Scraping data from the web is a craft that requires learning to use different tools. This is because you may start working on a target website with a scraping framework, realize there are issues you didn’t consider, and end up using other solutions.
Among the many tools a scraping engineer should master are headless browsers. But if you want to be completely honest, in the scraping industry there’s some confusion about the concepts of “headless browsers” and “browser automation tools”.
For your scraping needs, having a reliable proxy provider like Decodo on your side improves the chances of success.
In this article, you’ll get your ideas clear on headless browsers and browser automation tools. You’ll also discover the Oxylabs Headless Browser and learn how to use it in practice against common anti-bots. In particular, you’ll see the difference in servers’ responses when hitting the same target URLs with and without the Oxylabs solution.
Let’s get into it!
What is a Headless Browser?
A headless browser is a fully functional web browser that operates without a graphical user interface (GUI). To understand what this means in practice, it helps to discuss what a browser actually does under the hood.
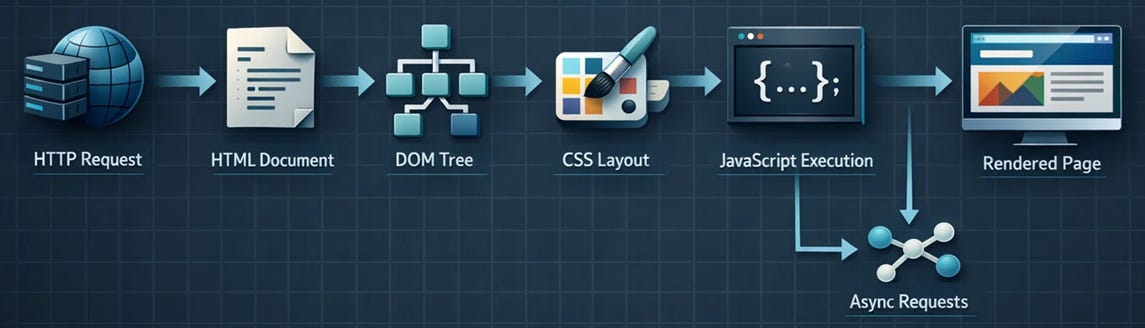
When you open a browser like Chrome and navigate to a URL, the browser performs a precise sequence of operations:
It fetches and applies CSS stylesheets to compute the visual layout, downloads and executes JavaScript files, and processes any asynchronous network requests (XHR/Fetch API calls) triggered by that JavaScript.
It renders everything into visible pixels on your screen.
Below is an image that graphically shows the whole process:
What happens under the hood when browsers perform actions
A headless browser performs every single one of those steps, except painting pixels to a physical display. It still builds the DOM, executes JavaScript, processes AJAX calls, and maintains a fully accurate representation of the page state in memory. But it does it without needing a graphical rendering environment.
It’s also important to understand the difference between a headless browser and a basic HTTP client. Tools like Python’s requests library or curl are pure HTTP clients. This means that they send a request and return whatever raw response the server provides. They have no concept of a DOM, no JavaScript engine, and no rendering pipeline.
The most widely used headless browsers are the following:
PhantomJS: One of the first dedicated headless browsers, built on an older version of WebKit. It was widely used before 2017 but has since been officially abandoned and is no longer maintained. You may still encounter it in legacy codebases, but it’s better not to use it for new projects.
Headless Chrome/Chromium: Google officially introduced headless mode in Chrome 59 (2017), effectively making PhantomJS obsolete overnight. It exposes the Chrome DevTools Protocol (CDP) as its programmatic interface, which automation frameworks connect to to send instructions and receive data.
Headless Firefox: Mozilla introduced headless support in Firefox 55. Powered by the Gecko rendering engine and the SpiderMonkey JavaScript engine, it’s a strong alternative to Chromium, particularly useful when you need to scrape or test behavior tied to the Gecko engine specifically.
WebKit: WebKit is the browser engine that powers Apple’s Safari. Playwright bundles a version of WebKit that can be run in headless mode on non-Apple platforms, giving you the ability to simulate Safari’s rendering behavior on Linux or Windows servers (something that would be otherwise impossible).
Splash: A lightweight, scriptable headless browser built specifically for web scraping, developed by the Scrapy team. It is written in Python and Lua, exposes an HTTP API, and integrates natively with the Scrapy framework, making it a beginner-friendly option for Python-based scraping pipelines.
Your scraping workflows deserve a proxy infrastructure that just works. With Swiftproxy on your side, consistency is built-in.
Headless Browsers vs. Automation Frameworks: A Critical Distinction
At this point, it’s essential to draw a clear architectural boundary between two categories that are frequently, but incorrectly, used interchangeably: headless browsers and browser automation frameworks.
As said in the previous paragraph, a headless browser is the actual browser engine itself. So, it’s the software responsible for all the core browser operations described above.
A browser automation framework, on the other hand, is a programming library or tool that sits on top of a headless (or full) browser and provides a developer-friendly API to control it programmatically. The framework itself does not render pages, execute JavaScript, or manage network traffic: it delegates all of that to the underlying browser engine. What it provides is an abstraction layer to navigate to URLs, click elements, fill in forms, wait for conditions, intercept network requests, take screenshots, and to perform any similar activity.
Think of it this way: the headless browser is the engine of a car, and the automation framework is the steering wheel, pedals, and dashboard. You need both to drive, but they are fundamentally different components with different responsibilities.
This distinction also has a practical implication. If a website employs bot detection based on browser fingerprinting, it’s the underlying browser engine’s characteristics that matter, not the automation framework on top of it. This means that switching from Puppeteer to Playwright doesn’t change your browser fingerprint if both are driving the same Chromium engine with the same configuration.
The list below reports the programming libraries and tools used to control headless (or full) browsers programmatically:
Puppeteer: A Node.js library developed and maintained by Google that provides a high-level API to control Headless Chrome/Chromium over CDP. It was the first major modern automation framework to replace PhantomJS and remains widely used in the JavaScript/Node.js ecosystem.
Playwright: Developed by Microsoft, Playwright is a more modern and feature-rich automation framework that supports Chromium, Firefox, and WebKit under a single unified API. It has become the preferred choice for many scraping engineers due to its superior handling of async operations, automatic waiting strategies, built-in network interception, and robust multi-browser support. On the side of programming languages, it’s available for Node.js, Python, Java, and .NET.
Selenium: The oldest and most widely adopted browser automation framework in existence, originally released in 2004. Unlike Puppeteer and Playwright, Selenium communicates with browsers via the W3C WebDriver protocol. This means it supports a broader range of browsers and is the de facto standard in enterprise testing environments. Selenium supports multiple languages, including Python, Java, C#, Ruby, and JavaScript, which gives it an exceptionally large community and an extensive ecosystem of documentation and tooling. For engineers working in Python, Selenium with a headless Chrome or Firefox driver is still a very common scraping approach. Its main trade-off is that it can be slightly slower and less ergonomic for modern async-heavy scraping scenarios.
Why Do Engineers Need a Headless Browser?
When you start defining how to scrape a website, your first instinct is often to reach for a lightweight HTTP client. And, in many cases, that is the right call. Simple, server-rendered websites that return complete HTML in their initial response are perfectly scrapable with tools like requestscoupled with BeautifulSoup.
However, as you begin working with modern websites, you will quickly encounter scenarios where an HTTP client falls flat. Understanding why this happens (and when a headless browser becomes necessary) is one of the most fundamental skills you need to master for your career.
This section discusses the most common scenarios when you need to use a headless browser for scraping target websites.
JavaScript-Rendered and SPA Content
The most common reason to turn to headless browsers is client-side JavaScript rendering. A large proportion of modern websites, in fact, are built as Single Page Applications (SPAs) using frameworks like React, Vue.js, Angular, or Next.js. In these architectures, the server does not send a fully populated HTML page. Instead, it sends a minimal HTML shell along with a bundle of JavaScript files. The browser then executes that JavaScript, which makes additional API calls to fetch the actual data and dynamically constructs the DOM.
If you scrape the raw HTML with an HTTP client, you will receive that empty shell and find none of the content you are looking for. A headless browser, instead, loads the page as a real user’s browser would, waits for the JavaScript to finish executing, and exposes the fully populated DOM for you to extract data from.
AJAX and Asynchronous Data Loading
Closely related to SPAs is the broader pattern of asynchronous data fetching. Even on websites that are not full SPAs, it’s extremely common for certain page sections to be populated via AJAX requests that fire after the initial page load. These requests hit internal or external APIs, and the responses are injected into the page dynamically.
With a headless browser and a tool like Playwright, you can intercept these network requests directly. Also, this is a powerful web scraping technique. Rather than scraping the rendered HTML, you capture the raw API response (usually as JSON), which gives you clean and structured data to work with.
Infinite Scroll and Pagination
Many websites like social media platforms, job boards, and e-commerce product listings implement infinite scroll. This means that new content is loaded dynamically as the user scrolls down the page. On the practical side, this means that there is no “Page 2” URL to follow. The content doesn’t exist in the DOM until a scroll event triggers a new batch of data to load.
In this scenario, a headless browser allows you to simulate scroll events, wait for new content to be injected, and continue extracting data until a stopping condition is met. This is fundamentally impossible to replicate with a plain HTTP client.
User Interaction Simulation
Some content is only accessible after specific user interactions, like clicking on a button, selecting a value from a dropdown menu, submitting a search form, switching between tabs, and similar. A headless browser gives you a full interaction API that allows you to click on elements, type into input fields, select options, trigger keyboard shortcuts, and simulate virtually any user action.
Many high-value websites deploy anti-bot systems that analyze incoming requests to determine whether they originate from a real browser or an automated script. These systems are trained using machine learning models to check for dozens of signals. A headless browser provides a much more convincing browser environment than a raw HTTP client.
In particular, with additional configurations and stealth patches, you can significantly reduce the likelihood of your scraper being detected and blocked. Of course, this is an arms race: anti-bot technology continues to evolve, and a headless browser alone is not a silver bullet.
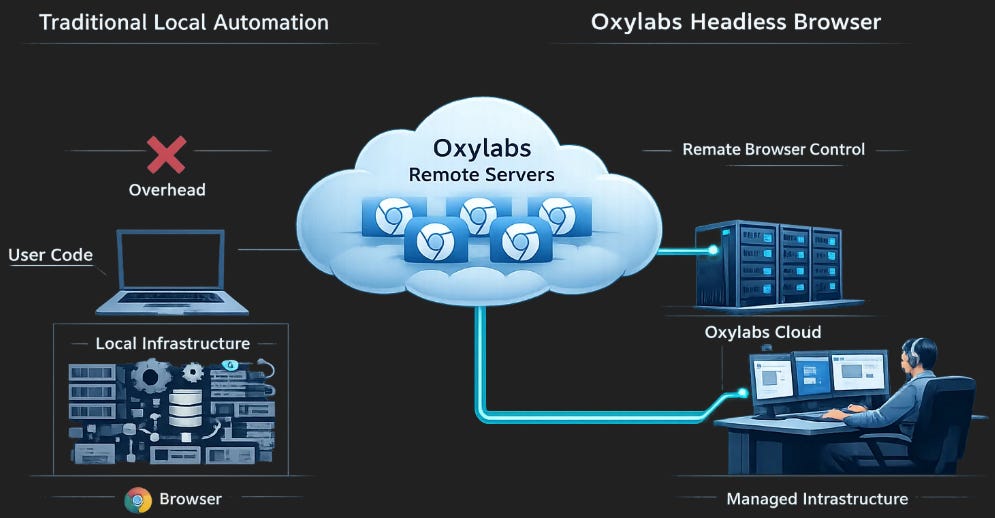
Oxylabs Headless Browser is a cloud-based browser automation solution that allows engineers to run and control remote browser sessions without the overhead of managing browser infrastructure locally or on their own servers. Rather than spinning up a local Chromium or Firefox instance on your own machine or cloud VM, Oxylabs Headless Browser offloads all of that complexity to dedicated remote servers maintained by Oxylabs.
The result is a production-ready and fully managed browsing environment that you connect to via a standard WebSocket (WSS) connection, and control using any automation framework that supports the Chrome DevTools Protocol (CDP) exactly as you would a local browser instance.
The image below shows, at a high level, the architectural difference between traditional browser automation and using Oxylabs’ solution:
Browser automation: local VS cloud-based via Oxylabs servers
What differentiates Oxylabs Headless Browser from a self-managed setup is the set of capabilities that are baked directly into the infrastructure. Rather than requiring you to implement them yourself, it provides you with the following:
Integrated residential proxies: Every browser session is automatically routed through Oxylabs’ residential proxy network. This eliminates the need to manage a separate proxy integration and ensures that outgoing requests carry legitimate residential IP addresses, reducing the risk of IP-level blocks.
Automatic CAPTCHA solving: The platform detects and solves CAPTCHAs by default on page load. For CAPTCHAs that appear mid-session, it exposes an event-based API via the window object that your script can subscribe to in order to pause and resume automation around the solving process.
Geolocation targeting: You can pin your browser session to a specific country, state, or city by appending query parameters directly to the WebSocket connection URL. This is essential for scraping geo-targeted content, verifying localized pricing, or accessing region-restricted pages without maintaining a geographically distributed proxy infrastructure yourself.
Device type emulation: The p_device parameter allows you to emulate desktop, mobile, or tablet environments. This gives you access to device-specific content, responsive layouts, and mobile-only UI elements or CAPTCHA variants.
Session inspection: This is a debugging feature that uses VNC (Virtual Network Computing) to give you real-time visual access to a running browser session. This is invaluable when diagnosing issues that are not apparent from logs alone. For example, for unexpected page rendering, broken interaction flows, or timing-related problems in your automation script.
MCP integration: Oxylabs Headless Browser supports connection via the Model Context Protocol (MCP), enabling AI systems such as Claude Desktop or Cursor to drive browser automation sessions autonomously, which opens the door to AI-driven scraping and web navigation workflows.
How Oxylabs Headless Compares to Self-Managed Headless Browsers
The practical significance of Oxylabs Headless Browser is best understood by contrasting it with the self-managed alternative. When you run Playwright or Puppeteer against a local Chromium instance, you are responsible for the entire stack:
Installing and maintaining the browser binary.
Managing proxy rotation and authentication.
Implementing CAPTCHA-solving integrations.
Applying stealth patches to avoid fingerprinting.
Handling concurrency limits.
Ensuring your infrastructure scales with your scraping workload.
Oxylabs Headless Browser, instead, abstracts all of that away behind a single WSS endpoint. In practice, this means that your code remains identical to what you would write against a local browser. The connection string is the only thing that changes.
This makes Oxylabs’ solution particularly suited for teams that need to scale browser-based scraping quickly without investing in dedicated infrastructure engineering.
As a final note, it’s worth considering that billing is based on traffic consumed (per GB). This means traffic optimization becomes an important cost management practice when operating at scale.
Testing Common Anti-bots The Hard Way: Step-by-step Tutorial on How to Hit Them Headless Mode
In this section, you will learn how to hit common anti-bots in headless mode using Playwright. The idea is to compare the results obtained in headless mode with the ones obtained using Oxylabs Headless Browser.
The target websites with their anti-bots are:
Ssense → Cloudflare
Gucci → Akamai
Loccitane → DataDome
Empire-cat→ Kasada
Let’s get into the tutorial!
Prerequisites and Requirements
To replicate this tutorial, you need at least Python 3.8 installed on your machine.
Create a new folder for your project:
mkdir test-antibots
At the end of this step, the test-antibots/ folder will have the following structure:
test-antibots/
   |
   |-- tester.py
   |
   |__ venv/
Where:
tester.py is the Python file that contains the scraping logic to test the antibots.
In the activated virtual environment, install the needed libraries:
pip install playwright chromium
Very well. You are ready to code your tester!
Step #1: Code The Scraper to Test the Anti-bots
To test the antibots, write the following in tester.py:
from playwright.sync_api import sync_playwright

# Target pages with their anti-bots
targets = [
    ("<https://www.ssense.com/en-us/men/designers/acne-studios>", "Cloudflare"),
    ("<https://www.gucci.com/us/en/pr/women/shoes-for-women/sandals-for-women/flat-sandals-for-women/womens-slide-sandal-with-horsebit-p-834427AAE046273>", "Akamai"),
    ("<https://loccitane.com/en-us/olio-jeunesse-divine-30ml-27DH030I22.html>", "DataDome"),
    ("<https://www.empire-cat.com/equipment/used/catalog/aa/j1s03815>", "Kasada")
]

results = []

# List of titles or substrings that indicate common blocks/challenges
BLOCK_INDICATORS = [
    "just a moment", "access denied", "attention required",
    "cloudflare", "ddos protection", "captcha", "verify you are human"
]

with sync_playwright() as p:
    browser = p.chromium.launch(headless=True)
    context = browser.new_context()

    for url, antibot in targets:
        page = context.new_page()
        try:
            # We capture the response to check the status code
            response = page.goto(url, wait_until="domcontentloaded")
            page.wait_for_timeout(5000)

            title = page.title() or ""
            status_code = response.status if response else 0

            # Validation Logic
            is_blocked = False
            error_reason = ""

            # 1. Check HTTP Status (403 Forbidden is a classic block)
            if status_code >= 400:
                is_blocked = True
                error_reason = f"HTTP {status_code}"

            # 2. Check for "Waiting Room" or "Block Page" titles
            elif any(indicator in title.lower() for indicator in BLOCK_INDICATORS):
                is_blocked = True
                error_reason = "Challenge/Block Page detected"

            # 3. Check for empty titles (Common with Kasada/DataDome blocks)
            elif not title or title.strip() == "":
                is_blocked = True
                error_reason = "Empty/N/A Title (Hidden Block)"

            if is_blocked:
                results.append({"url": url, "antibot": antibot, "title": title, "status": "fail", "error": error_reason})
                print(f"❌ [{antibot}] Blocked: {error_reason}")
            else:
                results.append({"url": url, "antibot": antibot, "title": title, "status": "ok"})
                print(f"✅ [{antibot}] Success: {title}")

        except Exception as e:
            error_msg = str(e).split('\n')[0] # Keep it brief
            print(f"❌ [{antibot}] Exception: {error_msg}")
            results.append({"url": url, "antibot": antibot, "title": None, "status": "fail", "error": error_msg})

        finally:
            page.close()

    browser.close()

# Print summary table
passed = sum(1 for r in results if r.get("status") == "ok")
failed = len(results) - passed

print("\n" + "=" * 105)
print(f"{'STATUS':<10} {'ANTIBOT':<12} {'RESULT/REASON':<30} {'URL'}")
print("=" * 105)
for r in results:
    status = "✅ PASS" if r.get("status") == "ok" else "❌ FAIL"
    antibot = r.get("antibot", "N/A")
    # Show the reason if it failed, otherwise show the page title
    display_info = r.get("error") if r.get("status") == "fail" else r.get("title", "N/A")
    print(f"{status:<10} {antibot:<12} {str(display_info)[:28]:<30} {r['url']}")
print("=" * 105)
print(f"✅ Passes: {passed}  |  ❌ Fails: {failed}  |  Total: {len(results)}")
print("=" * 105)
This snippet does the following:
Maps a list of target URLs, each associated with their anti bot.
Uses Playwright to launch a Chromium browser in “headless” mode.
For each target URL, the script:
Opens a new browser page.
Attempts to navigate to the site and waits for the initial content to load.
Pauses for 5 seconds to see if the page successfully renders the correct content or if it gets blocked/redirected by the site’s security.
Attempts to extract the page title as proof of a successful load.
Avoids the common trap of assuming a successful page load implies successful data access by checking the HTTP status code, title semantics, and structural integrity (line “N/A” titles)-
Prints summarized results.
Perfect. The code is ready for launch.
Step #2: Launch The Tester And Retrieve Results
After launching the scraper, the results are the following:
As you can see, the anti-bots successfully blocked 4 requests on 4:
Cloudflare returned a 403 (forbidden).
Akamai returns a Page.goto: net::ERR_HTTP2_PR error, which is often related to fingerprinting.
DataDome reported an empty result, which suggests it may have activated a captcha.
Kasada returns a 429 error. Generally speaking, a 429 error is a “too many requests” error, so the server blocks your scraper because you’re hitting it too fast. But specifically for Kasada, this often indicates a block due to fingerprinting.
Terrific! You made it to the end of this tutorial. Now it’s time to see what happens when implementing the Oxylabs solution.
Testing Common Anti-bots With Oxylabs Headless Browser: Step-by-step Tutorial
In this tutorial section, you will learn how to hit the same websites as in the previous paragraph using Oxylabs Headless Browser.
Good. You are ready to proceed with the actual tutorial.
Step #1: Code The Scraper Using Oxylabs Headless Browser
Write the following code in tester-oxylabs.py:
import json
import random
import string
import os
from playwright.sync_api import sync_playwright

# Define params for connecting to Oxylabs servers
username = "<your-oxylabs-username>"
password = "<your-oxylabs-password>"
endpoint = "ubc.oxylabs.io"

# Create folder for screenshots
if not os.path.exists("screenshots"):
    os.makedirs("screenshots")

def get_session():
    return ''.join(random.choices(string.ascii_lowercase + string.digits, k=10))

# Define Chrome arguments
chrome_args = json.dumps([
    "--disable-blink-features=AutomationControlled",
    "--enable-features=NetworkServiceInProcess"
])

# Define params for Oxylabs Headless Browser
params = f"p_device=mobile&p_cc=US&p_session_id={get_session()}&args={chrome_args}"
browser_url = f"wss://{username}:{password}@{endpoint}?{params}"

targets = [
    ("<https://www.empire-cat.com/equipment/used/catalog/aa/j1s03815>", "Kasada"),
    ("<https://www.ssense.com/en-us/men/designers/acne-studios>", "Cloudflare"),
    ("<https://loccitane.com/en-us/olio-jeunesse-divine-30ml-27DH030I22.html>", "DataDome"),
    ("<https://www.gucci.com/us/en/pr/women/shoes-for-women/sandals-for-women/flat-sandals-for-women/womens-slide-sandal-with-horsebit-p-834427AAE046273>", "Akamai")
]

# Define semantics to intercept in responses
BLOCK_TITLES = ["just a moment", "access denied", "attention required", "security measure", "not acceptable", "403 forbidden"]
results = []

def run_benchmark():
    with sync_playwright() as p:
        for url, antibot in targets:
            print(f"---\nTesting {antibot}...")
            try:
                browser = p.chromium.connect_over_cdp(browser_url)
                context = browser.new_context()
                page = context.new_page()

                captcha_detected = False
                def handle_log(msg):
                    nonlocal captcha_detected
                    if "oxylabs-captcha-solve-start" in msg.text:
                        print(f"   [Solver] {antibot} challenge detected...")
                        captcha_detected = True
                    elif "oxylabs-captcha-solve-end" in msg.text:
                        print(f"   [Solver] {antibot} resolved!")
                        captcha_detected = False

                page.on("console", handle_log)
                page.goto(url, wait_until="domcontentloaded", timeout=60000)

                # Wait for the page to stabilize
                if captcha_detected:
                    page.wait_for_timeout(15000)
                else:
                    page.wait_for_timeout(8000)

                # Make and save screenshots
                screenshot_path = f"screenshots/{antibot.lower()}_result.png"
                page.screenshot(path=screenshot_path, full_page=False)
                print(f"   [Camera] Screenshot saved: {screenshot_path}")

                title = page.title() or ""
                low_title = title.lower()
                is_blocked = any(bt in low_title for bt in BLOCK_TITLES)

                if len(title) > 5 and not is_blocked:
                    print(f"✅ {antibot} PASS: {title[:30]}...")
                    results.append({"url": url, "antibot": antibot, "status": "ok", "title": title})
                else:
                    print(f"❌ {antibot} FAIL: {title}")
                    results.append({"url": url, "antibot": antibot, "status": "fail", "error": title})

                browser.close()

            except Exception as e:
                print(f"❌ {antibot} Exception: {str(e)[:50]}")

run_benchmark()
Below is what changes with respect to the version in the previous paragraph:
It defines the credentials for connecting to Oxylabs servers and creates a folder where it will later store screenshots.
With chrome_args(), it defines some parameters for setting the automation in Chrome.
In the string params, the p_mobile and *p_cc* respectively manage the perceived device type and IP.
It manages CAPTCHAs with oxylabs-captcha-solve-start and oxylabs-captcha-solve-end. And since it needs to manage CAPTCHAs at each request, the code now has a timeout that helps the pages stabilize before the scraper passes on to the next target URL.
It uses page.screenshot() to make screenshots after the server sends the request and saves them into the previously created folder. This is important because the exceptions can’t all be handled via intercepting HTTP responses or via semantics. By making a screenshot before the connection is closed, you can actually see if the scraper has passed the anti-bot or if it failed at it.
Good. You’re now ready to run the code and see the results.
Step #2: Launch The Script
After launching the scraper, the results are the following:
As you can see, using the Oxylabs Headless Browser, the scraper overcomes all the anti-bots!
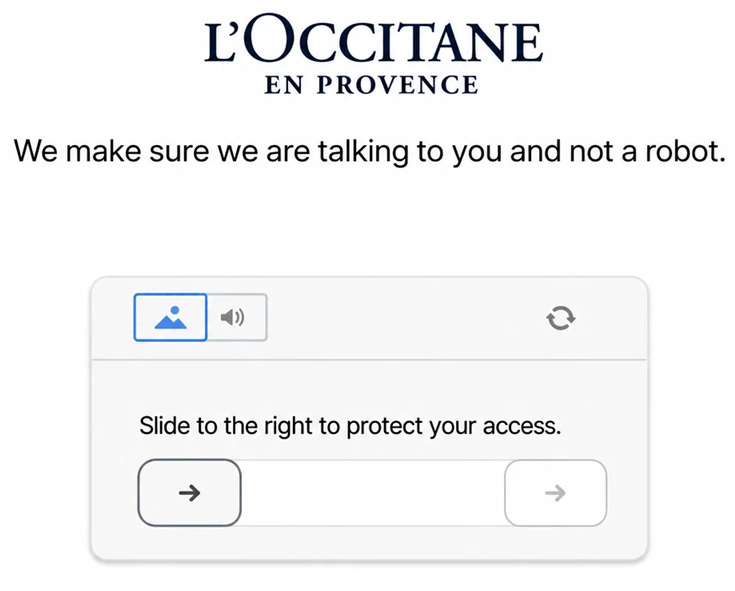
As a final note, consider that, based on the configuration and settings you will actually implement, DataDome (but also other anti-bots) may activate sliding captchas:
Hooray! You successfully made it to your first scraping project using the Oxylabs Headless Browser.
The Web Scraping Club is a reader-supported publication. To receive new posts and support my work, consider becoming a free or paid subscriber.
Conclusion
In this article, you learned the actual distinction between headless browsers and browser automation tools. You also discovered the Oxylabs Headless Browser which, despite the name, it’s cloud-based browser automation. The difference between this and the browser automation tools you already know is that it’s cloud-based. This means that when it’s called via the code, it manages all the infrastructure on its own without overhead on your side.
As you learned in the tutorial section, it’s also pretty easy to configure and to use: you just need to manage some parameters and call the Oxylabs endpoint.
So, let us know: were you already using the Oxylabs Headless Browser?
Did you like this article? Share it with someone who might find it useful and get a discount on paid plans.