
Tool of the week #1: Bright Data Scraper Studio, From Prompt to Production Scraper in Minutes
Explore how Bright Data's Scraper Studio bridges the gap between AI-assisted building and full IDE-level control without locking you into either.

If you’ve been building serious scrapers for a while, you know that the real bottleneck is everything around the extraction logic. Especially for production-ready scrapers, you have to spend hours wiring up proxy rotation, managing headless browser sessions, handling rate limits and fingerprinting, and then babysitting the whole system when the target site inevitably changes its DOM structure. The actual scraping part? It’s maybe 20% of the whole work.
As AI usage is growing more and more every day, you’d like an AI-powered tool that can improve your scraping productivity, don’t you?! Especially when it comes to managing selectors, and DOM structure changes…
Well, there’s good news for you: this is the exact gap Bright Data Scraper Studio is designed to close!
This article discusses what Bright Data’s Scraper Studio is, why it exists, and how to use it with a step-by-step tutorial.
Let’s get into it!
What Scraper Studio Actually Is
Scraper Studio is a cloud-hosted, end-to-end scraping environment running entirely on top of Bright Data’s infrastructure. The tool is designed from the ground up with scraping primitives in mind, as it provides built-in proxy rotation, native JavaScript rendering, anti-bot handling, and direct integrations with data delivery targets like Amazon S3, Snowflake, Google Cloud, and Microsoft Azure.
The platform offers two build modes that sit on the same underlying scraper runtime:
AI agent mode: You provide a target URL and a plain-English description of the data you want to extract. The AI agent visits the page, infers a structured output schema, and then generates the full scraper code for you. At the end of this automated process, you review and approve the schema before code generation begins. This gives you a checkpoint to catch misaligned fields before they propagate into your pipeline, allowing you to change them.
Full IDE mode: A full browser-based JavaScript code editor with debugging tools for when you need direct, line-level control over the scraper logic. This is the mode you can use for when you’re dealing with multi-stage scrapers, custom pagination logic, complex state management between page navigations, or sites with particularly aggressive anti-bot stacks that need fine-tuned handling.
What’s more important is that both modes produce the same type of scraper. This means that you’re never locked into one approach: a scraper built in the AI Agent mode can be opened and edited in the IDE at any time, and any scraper can be updated using the Self-healing tool.
Scraper Studio Key Features
Let’s take a close look at Scraper Studio’s features:
Built-in proxy infrastructure: Scraper Studio runs on Bright Data’s proxy network which, among other types, provides users with 400+ million residential IPs across 195 countries, with 99.99% uptime. For scraping professionals, this means no proxy pool management and, more importantly, no dealing with burned IPs.
Anti-bot bypass, natively integrated: JavaScript rendering, fingerprinting evasion, and bot detection bypass are built into the runtime. This is significant because it means your scraper code doesn’t need to account for these concerns. You write the extraction logic, and the platform handles the unblocking automatically.
AI-powered self-healing: This is arguably the most operationally relevant feature for running scrapers long-term. When a target site changes its structure, and your scraper breaks, the self-healing tool lets you describe the fix in plain English. The AI analyzes the current code, proposes changes with a diff view, and you approve or reject them. This means that you remain in control of the overall process, as changes aren’t auto-applied unless you explicitly enable auto-approval
Scheduled runs and data delivery: Scraper Studio includes a scheduling layer, so you can configure periodic runs without external orchestration. Combine this with native delivery to S3, Snowflake, GCS, or Azure, and you have a complete data pipeline that starts from scraping and ends with structured output in your data warehouse, with no spaghetti code required.
CLI and agent integration: If you prefer working outside the browser UI, scrapers can be built and triggered via the Bright Data CLI, and the AI Agent mode is accessible programmatically, currently compatible with tools like Claude Code, Cursor, and Codex. This means you can integrate Scraper Studio into existing developer workflows without being locked into the web interface.
Wide pricing offer: The pricing offer may seem like a secondary theme, but it’s not. First and foremost, Bright Data offers you 5k page loads for free every month, backed by their expert support if you need it. The other pricing options are:
Pay-as-you-go: $1.5 per 1k page loads, and you pay only for successful requests.
Scale: $400/Mo that includes about 400k page loads per month and more.
Enterprise: A custom pricing tier for enterprises, based on their specific needs.
Scraper Studio Best Use Cases
If you’re already familiar with Bright Data products and offers, you may be asking why use Scraper Studio. Below is a list of practical examples when this is the right tool to use:
No APIs or ready-to-use datasets: If you need to scrape a site that isn’t available on Bright Data’s pre-built Datasets Marketplace or on its web scraping APIs, and you want to own the scraper logic yourself but not the infrastructure, well, Scraper Studio is your best choice.
Recurring pipelines: When you’re building a recurring data pipeline and don’t want to manage cron jobs, deployment infrastructure, or proxy pools separately.
Quick prototypes: The AI Agent mode can go from a single URL to a working scraper in under 10 minutes. This makes it genuinely useful for validating whether a scraping approach is feasible before committing engineering time on a larger scale.
You’re in a team with mixed technical levels: The AI Agent is accessible to non-engineers, and the IDE gives developers full control. They both produce the same type of scraper, deployable on the same infrastructure, and as it is interchangeable, your team can manage the same project with different technical levels.
How to Build a Web Scraper With Scraper Studio Using the AI Agent Mode
Time to take the theory into practice. In this section, you’ll learn how to create a web scraper with Scraper Studio using its AI agent mode. The target URL for this tutorial is from the Kappa’s website:
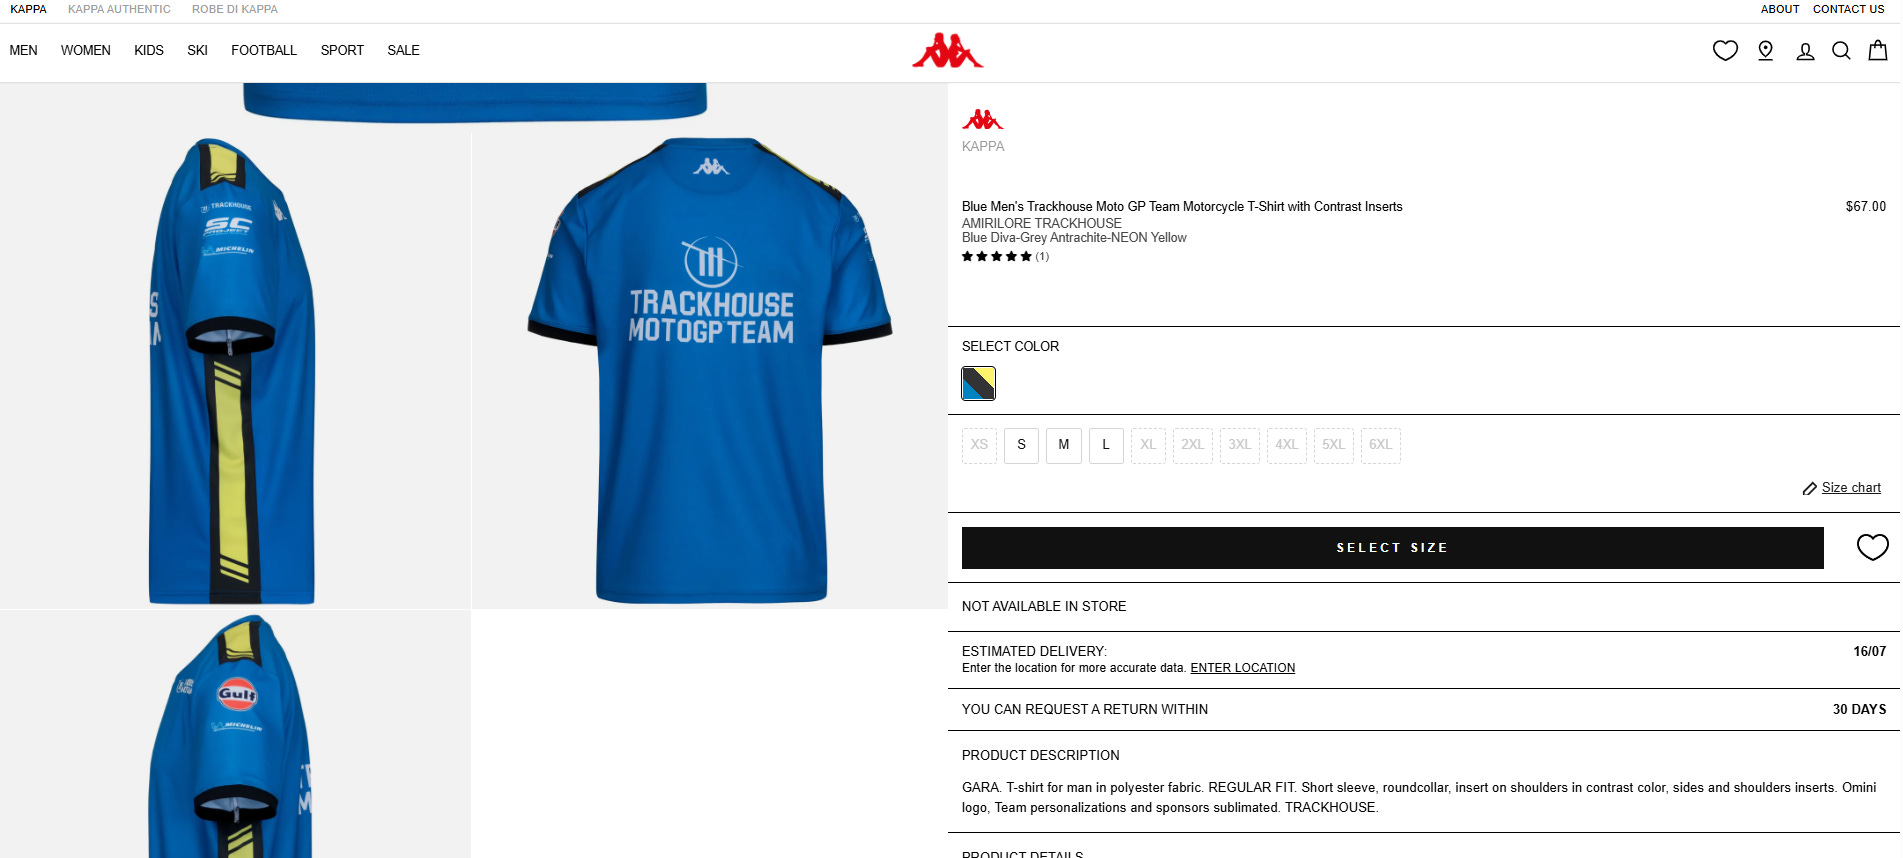
The scraper will retrieve the data from this target page, using the constraints via the prompt description.
Follow the next steps to build your scraper!
Step #1: Create a New AI Web Scraper Project
After creating a new Bright Data account, go to the Scrapers tab and click on Develop a web scraper under New:
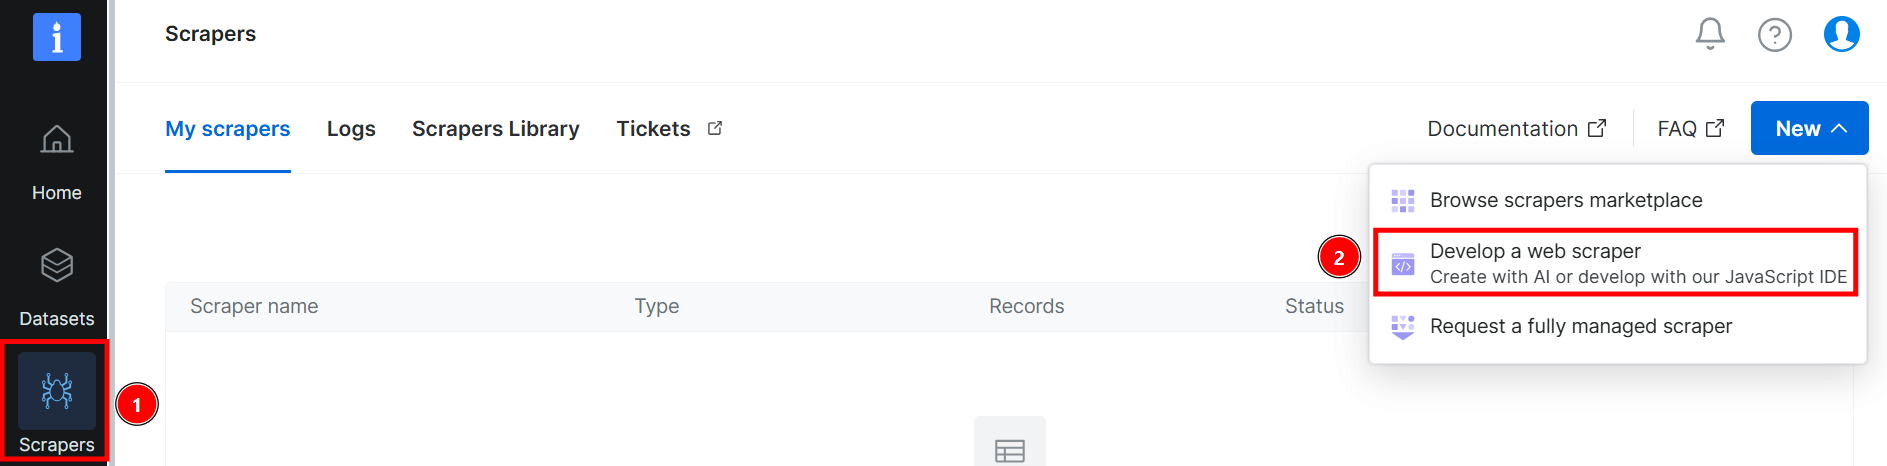
You’ll be redirected to a page where you can insert the target URL and the prompt. For this tutorial, the prompt is the following:
Extract the product name, price, available variations / colors, sizes, image URLs, product description, product details.Below is the visual result:
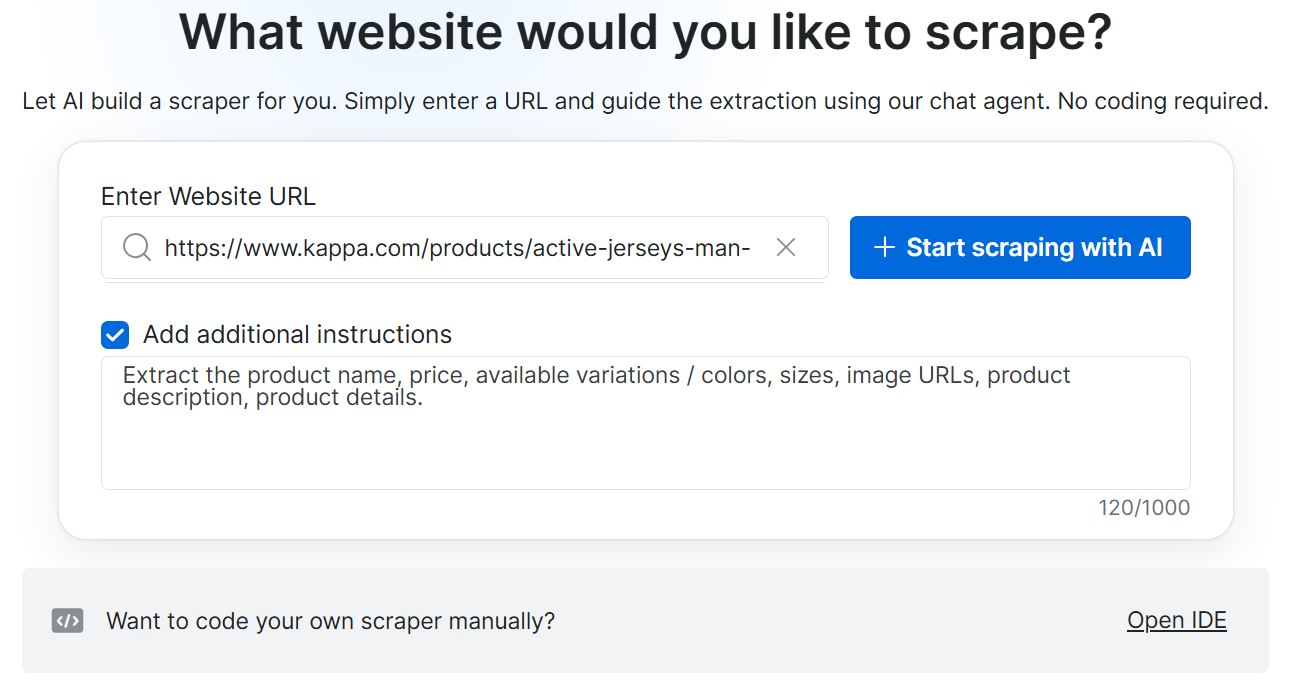
Note that this is also where you can immediately go for the IDE mode by clicking on Open IDE.
When you’re ready, click on Start scraping with AI, and Scraper Studio will make its magic!
Step #2: Analyze and Approve the Output Schema
The system will automatically produce the output below:
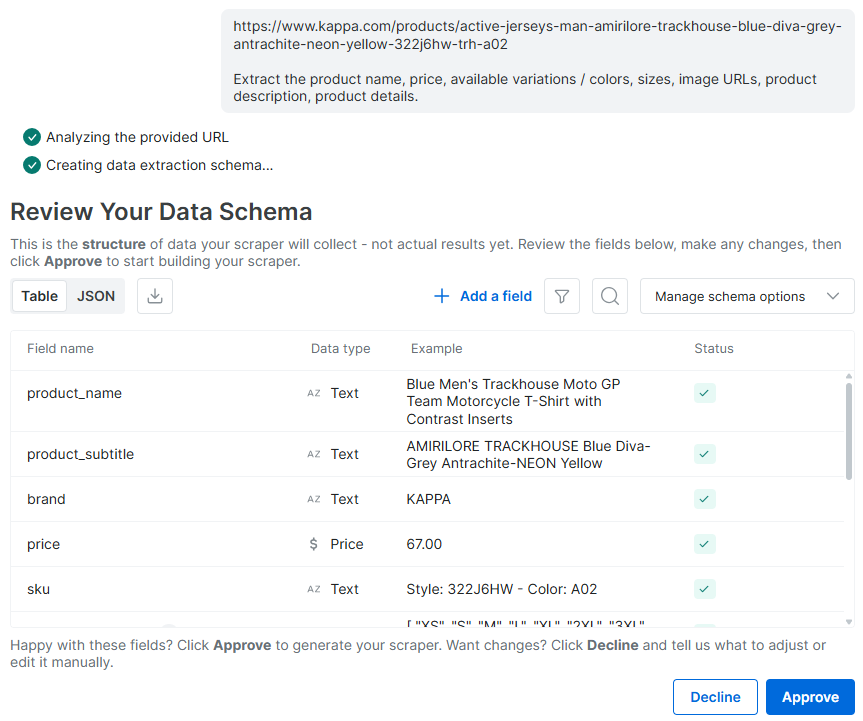
This is the output schema. It’s a structured list of data fields the scraper will extract, along with their data types. Compare this with the data in the target page, and click Approve if the output matches your expectations.
After your approval, Scraper Studio will start creating the web scraper. When the process is done, you’ll receive the following pop-up:
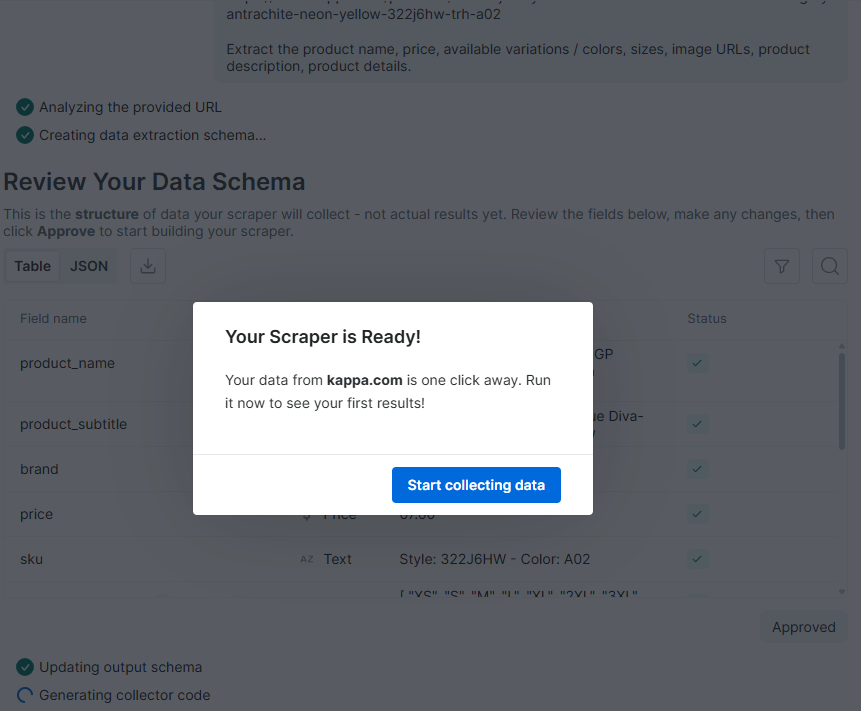
You’ll also get a notification email when the scraper is ready:
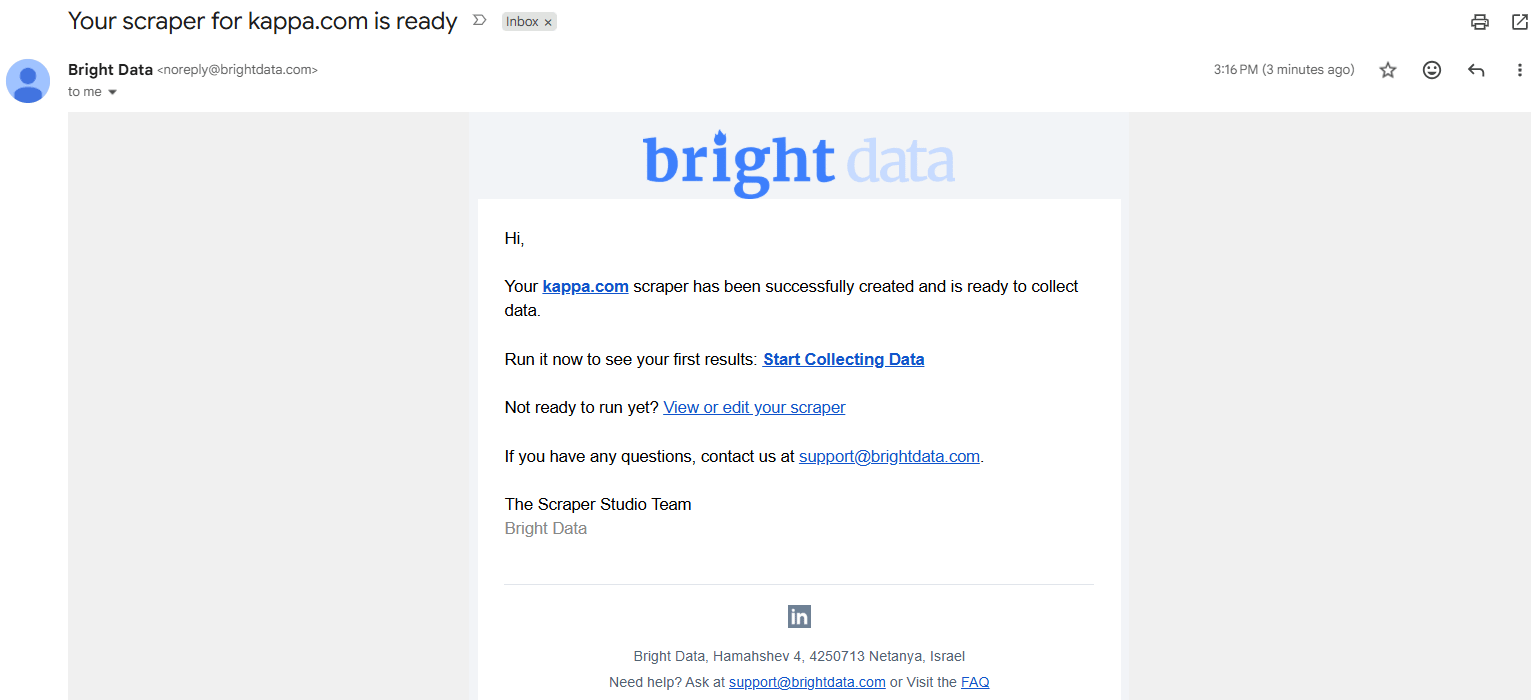
All right, your scraper is ready for data retrieval.
Step #3: Manage Preferences and Retrieve The Data
When the scraper is ready, this doesn’t mean the data is scraped. Before scraping the data, you have to manage your preferences.
First of all, go into your scrapers and navigate to the Delivery preferences tab:
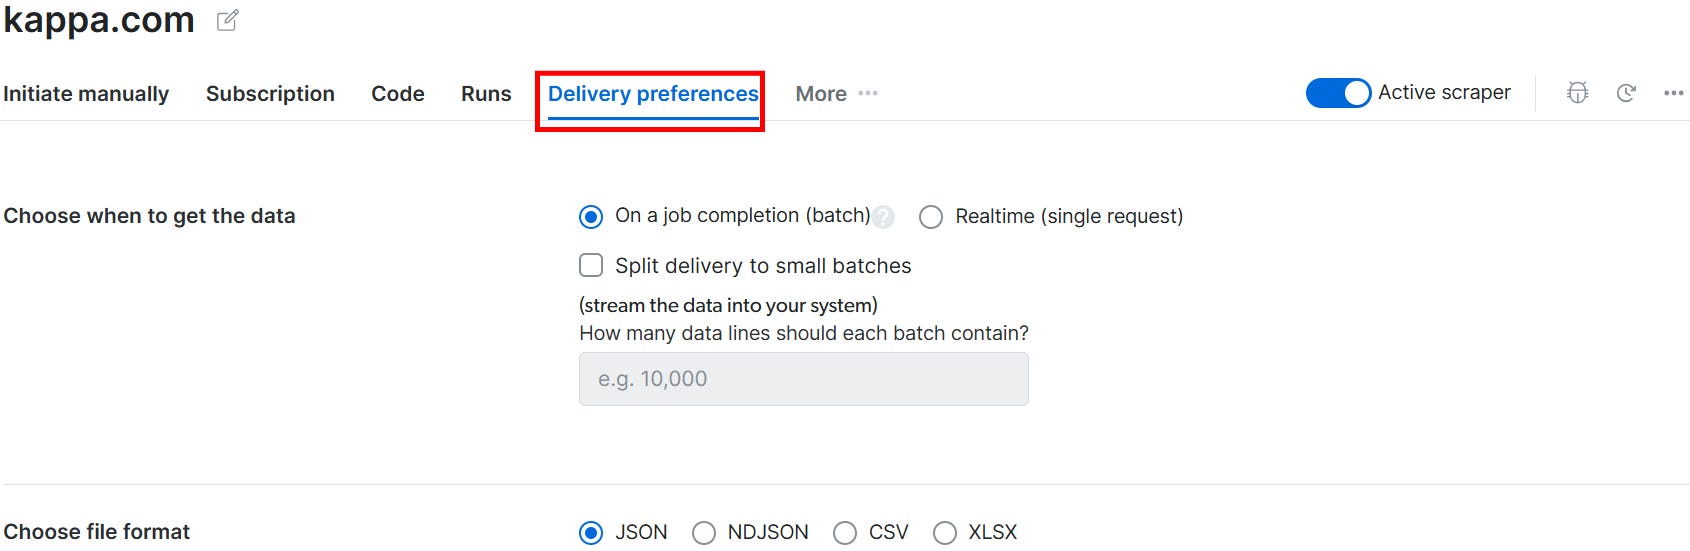
Here is where you can choose among:
Data format for local download, like JSON, NDJSON, CSV, or XLS.
Third-party connections like Amazon S3 bucket, AWS, Snowflake, and more.
Get notified via email based on the status of the data delivery.
If you want a scraper that starts recurrently, navigate to the Subscriptions tab and set your schedule:
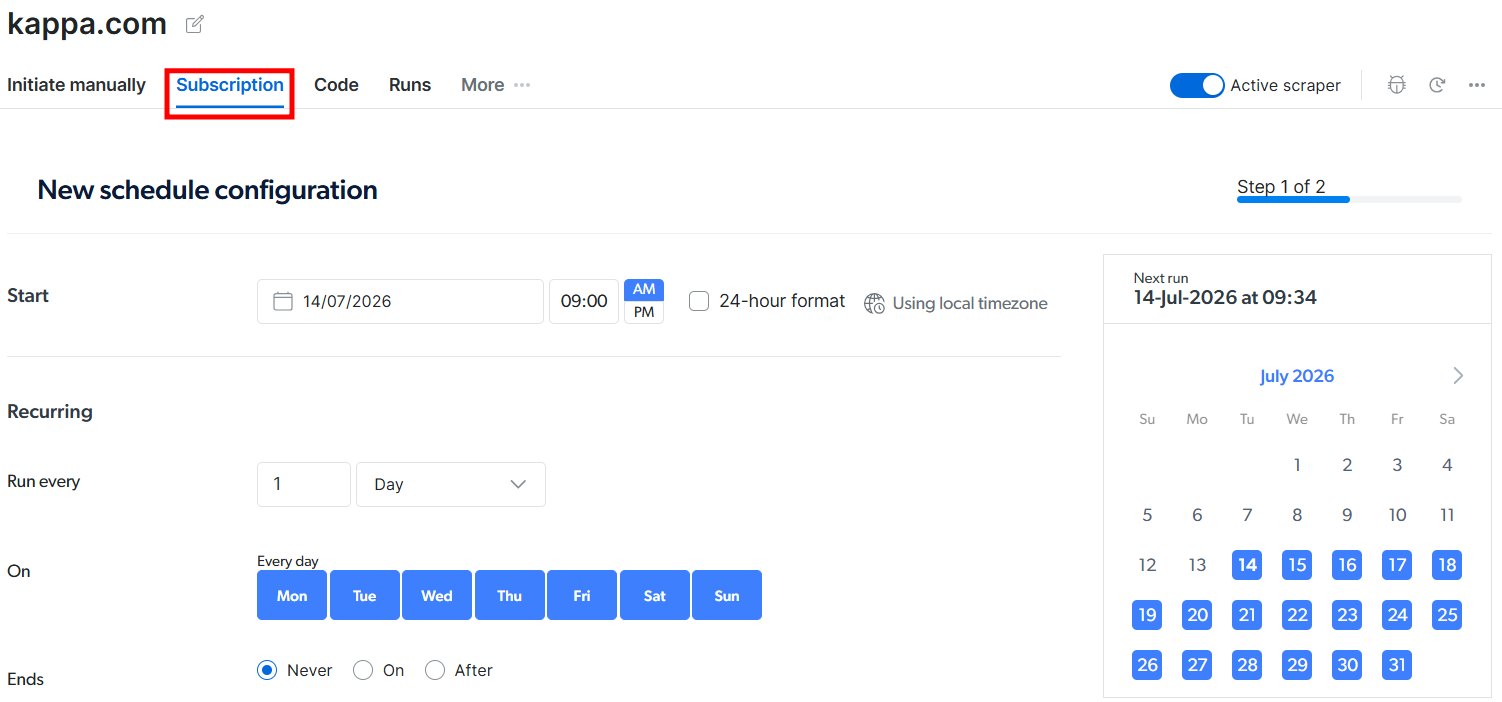
If you just want to test things around or if you need a one-time scraper, the Initiate manually tab is already sufficient. You just need to click on Start, and the scraper will begin retrieving the data:
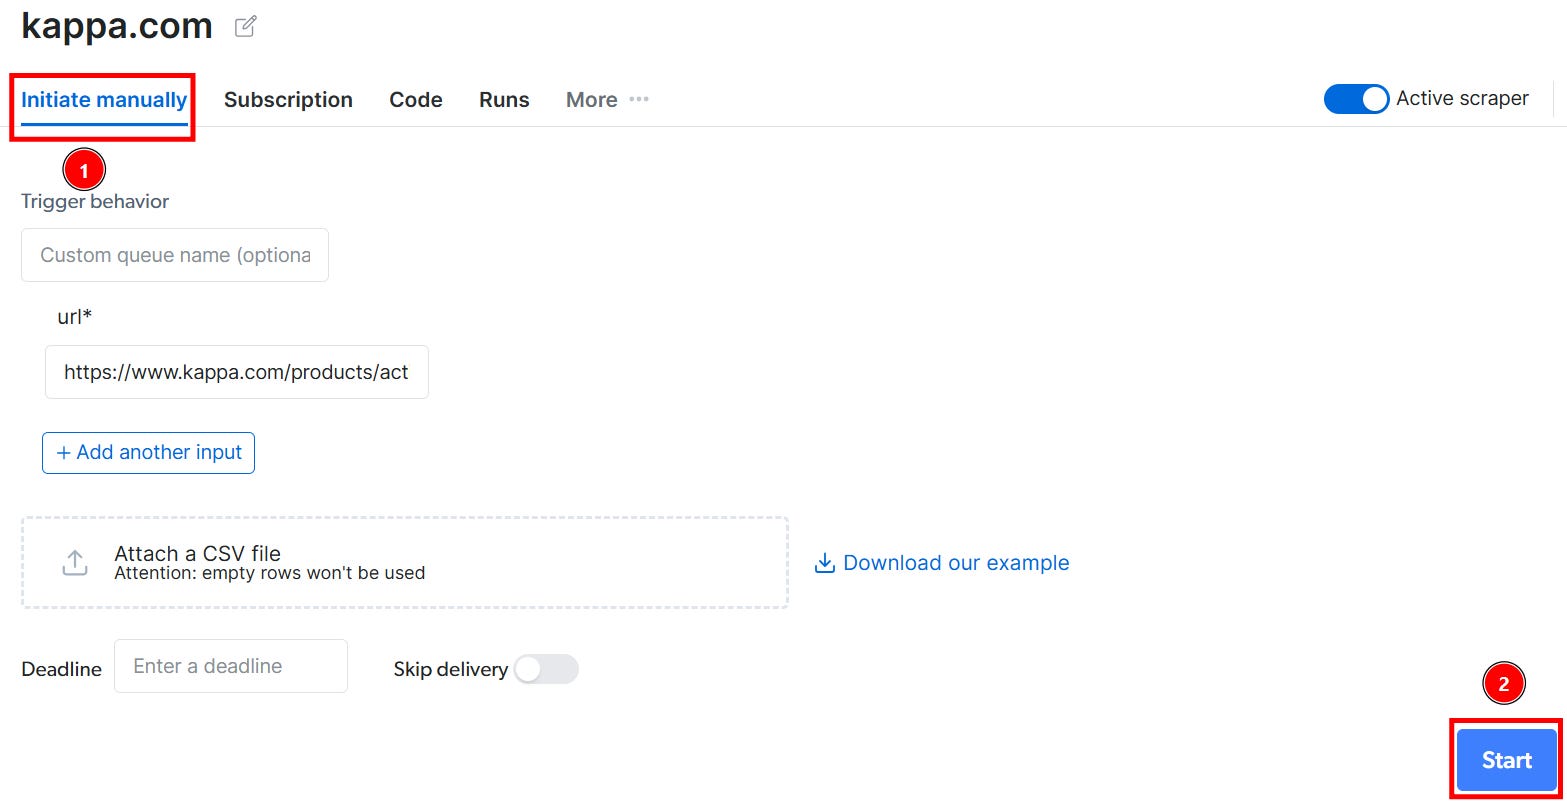
Very well! You made it to retrieve data with your first scraper made with Scraper Studio.
Step #4: Check Runs and Go to IDE Mode
To check the status of each scraping run, go to the Runs section. This will display all the information you need on each data retrieval performed by the scraper:
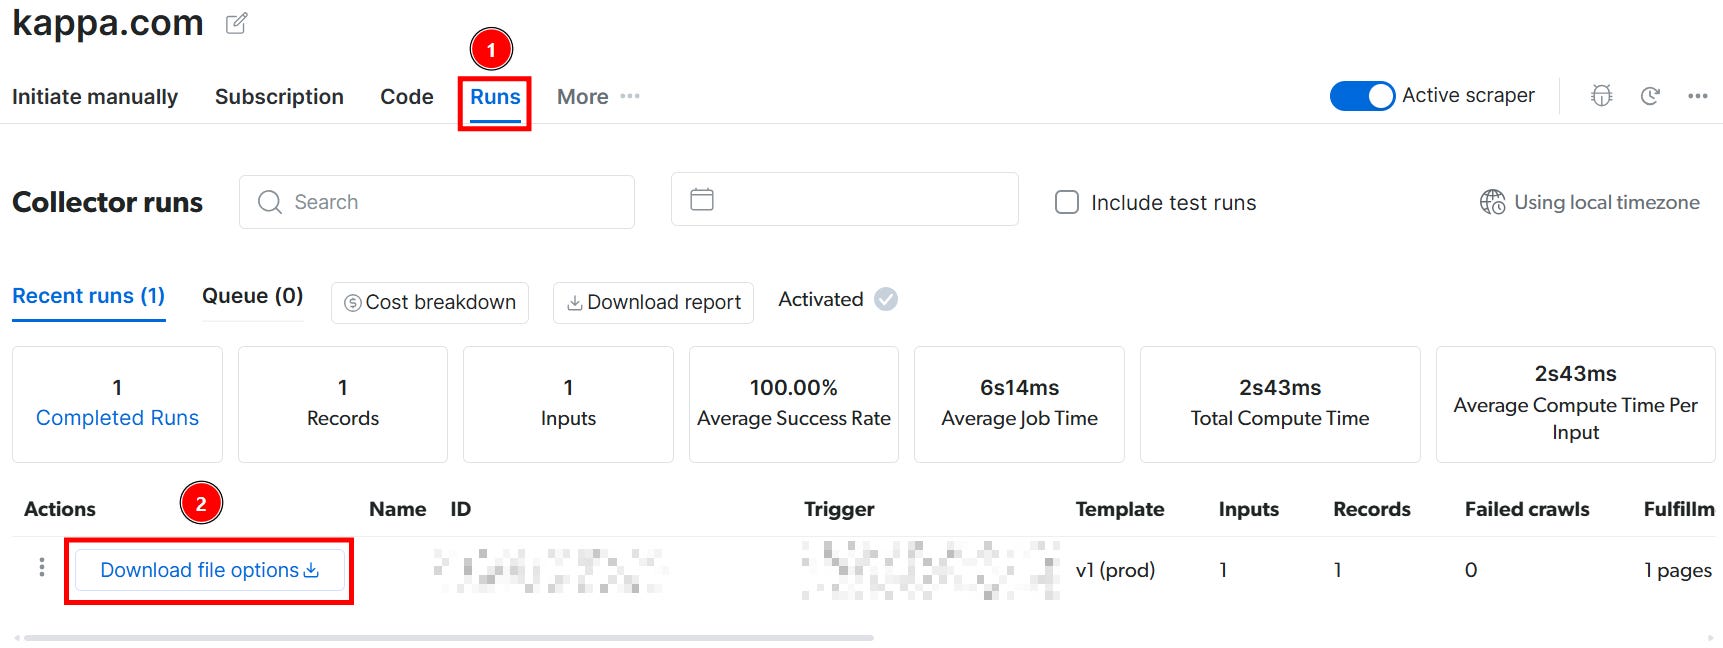
The Actions section allows you to download the data in different formats. Below is the result in JSON:
[
  {
    "product_name": "Blue Men's Trackhouse Moto GP Team Motorcycle T-Shirt with Contrast Inserts",
    "product_subtitle": "AMIRILORE TRACKHOUSE Blue Diva-Grey Antrachite-NEON Yellow",
    "brand": "KAPPA",
    "price": {
      "value": 67,
      "currency": "USD",
      "symbol": "$"
    },
    "sku": "Style: 322J6HW - Color: A02",
    "available_sizes": [
      "XS",
      "S",
      "M",
      "L",
      "XL",
      "2XL",
      "3XL",
      "4XL",
      "5XL",
      "6XL"
    ],
    "image_urls": [
      "<https://www.kappa.com/cdn/shop/files/UB322J6HWTRHA02_5f5f425b-48d1-4181-af4c-ce863229cbf4.jpg>",
      "<https://www.kappa.com/cdn/shop/files/UB322J6HWTRHA02_aa19b0fa-ca41-4894-ad74-8d408cc31725.jpg>",
      "<https://www.kappa.com/cdn/shop/files/UB322J6HWTRHA02.jpg>",
      "<https://www.kappa.com/cdn/shop/files/UB322J6HWTRHA02_8bd76dc9-0550-48f9-a974-e3c38a4b707e.jpg>"
    ],
    "description": "Product Description GARA. T-shirt for man in polyester fabric. REGULAR FIT. Short sleeve, roundcollar, insert on shoulders in contrast color, sides and shoulders inserts. Omini logo, Team personalizations and sponsors sublimated. TRACKHOUSE.",
    "product_details": "Description Active Jerseys Gender Man Season Spring Composition Main Fabric: Recycled Polyester 100%",
    "input": {
      "url": "<https://www.kappa.com/products/active-jerseys-man-amirilore-trackhouse-blue-diva-grey-antrachite-neon-yellow-322j6hw-trh-a02>"
    }
  }
]
As you can see, the results are exactly how’d you expect.
To change the mode to the full IDE one, navigate to the Code tab:
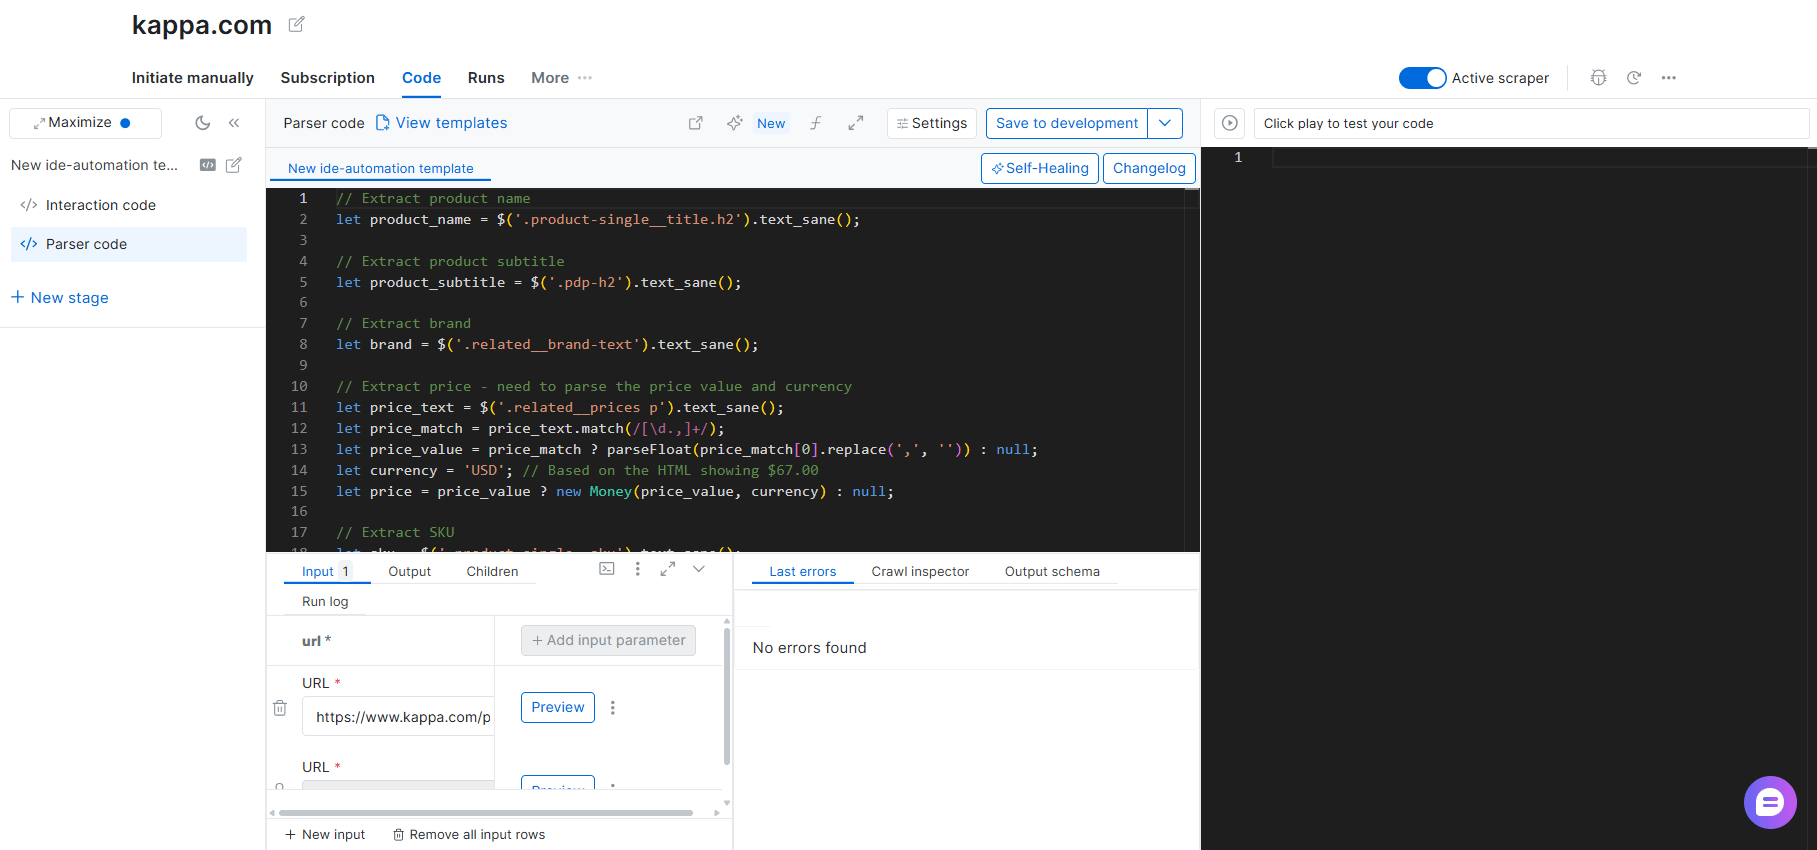
This is where you can write your custom JavaScript to modify anything you need.
Terrific! You completed your first scraping project with Bright Data’s Scraper Studio.
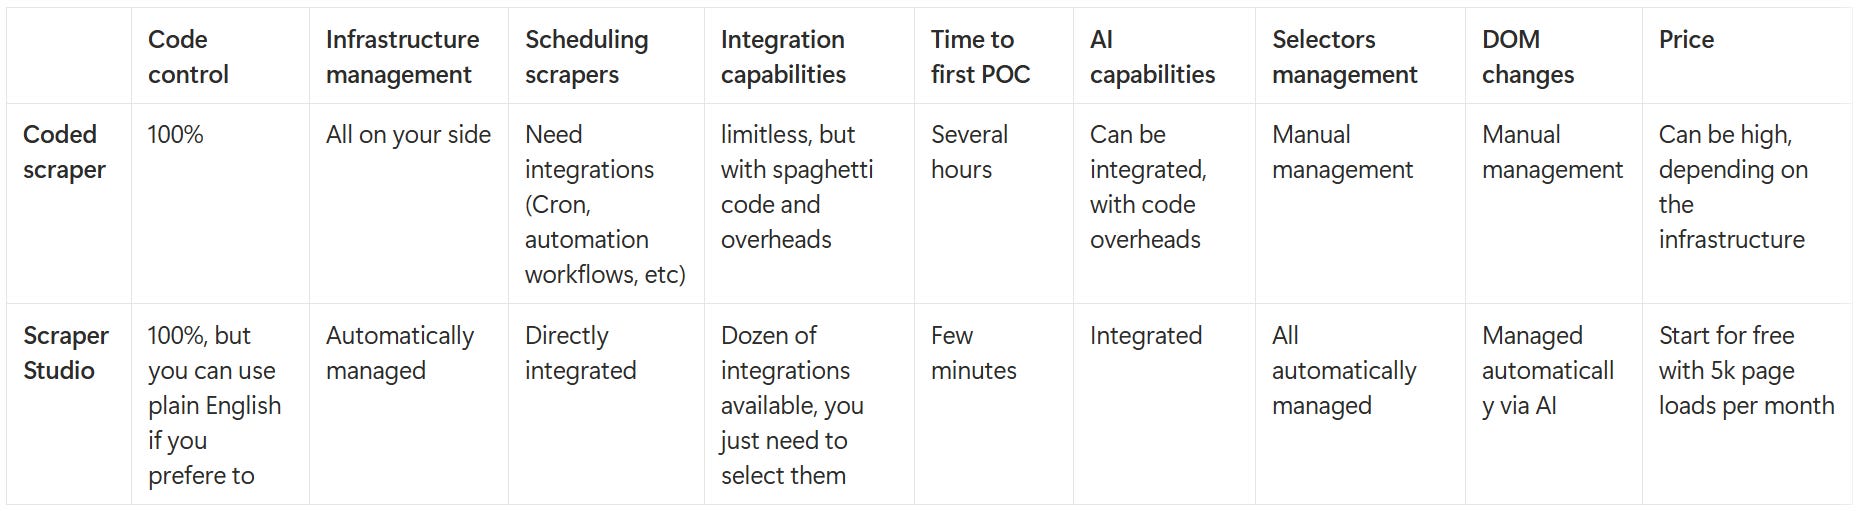
Comparison Table: Scraping via Custom Code Vs Using Scraper Studio
The table below summarizes the differences in scraping the same target using a scraper you coded yourself or using Scraper Studio:
Conclusion
In this article, you discovered what Bright Data’s Scraper Studio is, its features and best use cases, and how easy it is to use it.
As you’ve learned, Scraper Studio is an ideal solution for building a web scraper without any infrastructure overhead, but also without managing selectors manually. Thanks to it, you don’t have to deal with common challenges like infrastructure maintenance, proxy rotation, and anti-bot bypass, but also with DOM changes.
In a matter of a few minutes, you can go from a prompt written in natural language to a production-ready scraper, with automated data delivery to Amazon S3, Snowflake, and many other destinations, and with the possibility to schedule your scrapers and manage DOM changes without manual overhead.
So, let us know in the comments: have you ever tried Scraper Studio? What’s your experience with it?
Did you like this article? Share it with someone who might find it useful and get a discount on paid plans.